First startup
Copyright © Quectel Wireless Solutions Co., Ltd. 2026. All rights reserved.
Safety information (read carefully)
💡 Hardware usage requirements
Please use the USB-A power cable (5 A) provided in the kit. Do not use a power supply rated for an output current below 3 A(such as a mobile phone charger); otherwise, the Quectel Pi H1 smart single-board computer may be underpowered or repeatedly shut down abnormally. If you need to connect a high-power module (such as a motor), power the module separately. Do not draw power through the Quectel Pi H1’s USB or GPIO port, to avoid overload and damage to the Quectel Pi H1.
When connecting or disconnecting accessories (such as a camera cable or network cable), you must disconnect the power to the Quectel Pi H1 first, because hot-plugging may damage the interface chips. The USB & DP interface supports only DP display and power output; it cannot be used to power the smart single-board computer.
Operating temperature: -20 to +70 °C. Do not use the computer in high-temperature environments (e.g., direct sunlight), humid (humidity >80%), or dusty environments. Before operation, please touch a metal object to discharge static electricity, and avoid touching the chip pins on the single-board computer directly with your hands.
System and software precautions
Only system images officially provided for this product are supported. Do not flash an image for another smart single-board computer (such as a Raspberry Pi); otherwise, driver incompatibility, failure to boot or other problems may occur.
If you need to customize the system, use Yocto Linux SDK for development, and ensure that the kernel version and driver modules are compatible with Quectel Pi H1.
Do not modify the core configuration files (such as config.txt) under the /boot partition; otherwise, the system may fail to boot. If modification is necessary, back up the corresponding files first.
When installing software, preferably use the apt command to download packages from official repositories. Avoid installing DEB packages from unknown sources to reduce the risk of malware infection or system faults.
Preparation
Depending on the use case, choose one of two configuration options: an external display or an ADB connection. √ indicates required, and ○ indicates optional.
Accessory |
Requirements |
External display |
ADB connection |
|---|---|---|---|
Quectel Pi H1 smart single-board computer |
— |
√ |
√ |
Power adapter |
5 V / 5 A or 9 V / 3 A PD |
√ |
√ |
Network cable |
Connect to a router or use Wi-Fi |
○ |
○ |
Display |
Desktop / laptop / MIPI display |
√ |
○ |
USB-C DP / HDMI cable |
Connect to the display |
○ |
○ |
Keyboard / mouse |
USB wired/wireless |
√ |
√ |
Desktop / laptop |
For running terminal software |
○ |
√ |
USB Type-C to USB Type-A data cable |
Connect the Quectel Pi H1 to the desktop |
○ |
√ |
Preparation before powering on
The header pins marked AUTO_POWER_ON at the upper-left corner of the Quectel Pi H1 must be shorted with a jumper cap to enable automatic startup when power is applied.
Jumper cap status description:
Status |
Appearance |
Behavior |
|---|---|---|
Shorted (recommended) |
The jumper cap is placed over both header pins, electrically connecting them. |
The system starts automatically when power is connected; no additional operation is required. |
Not shorted |
The jumper cap is not installed or is placed on only one pin (left floating). |
After power is connected, the system does not start automatically; press and hold the PWRKEY button to power it on manually. |
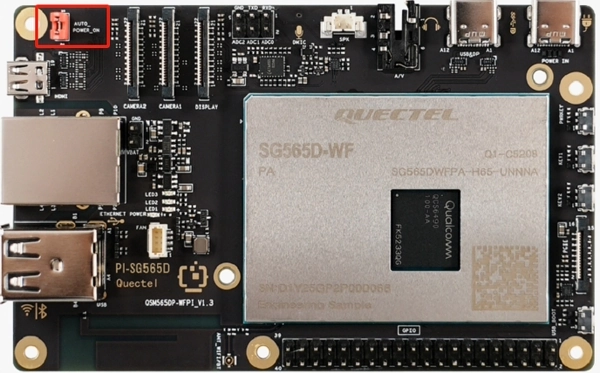
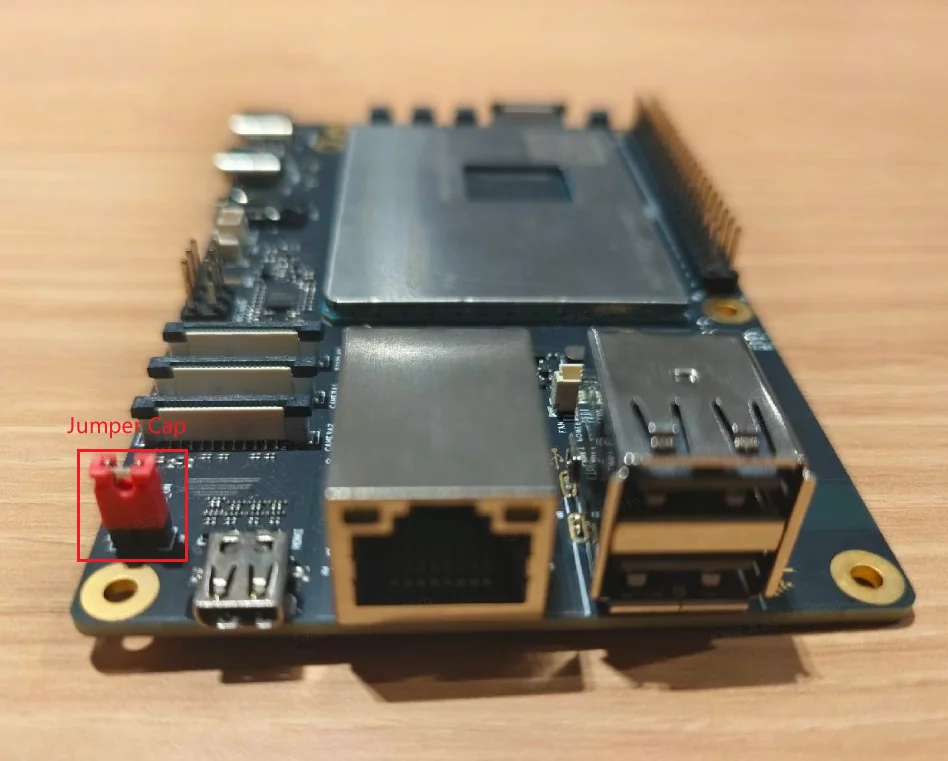
Note
If AUTO_POWER_ON is not shorted, press and hold the PWRKEY button after powering on to start the system.
Select a use case
Quectel Pi H1 smart single-board computer is shipped with the Debian 13 system image by default, so reflashing is normally unnecessary. Select the appropriate startup method according to your equipment:
Scenario |
Applicable conditions |
Go to |
|---|---|---|
With an external display |
HDMI / USB-C DP / MIPI display, keyboard, and mouse available |
|
Without an external display |
No display, but a USB-C data cable and a computer are available |
Start the Quectel Pi H1 with an external display
Hardware connections
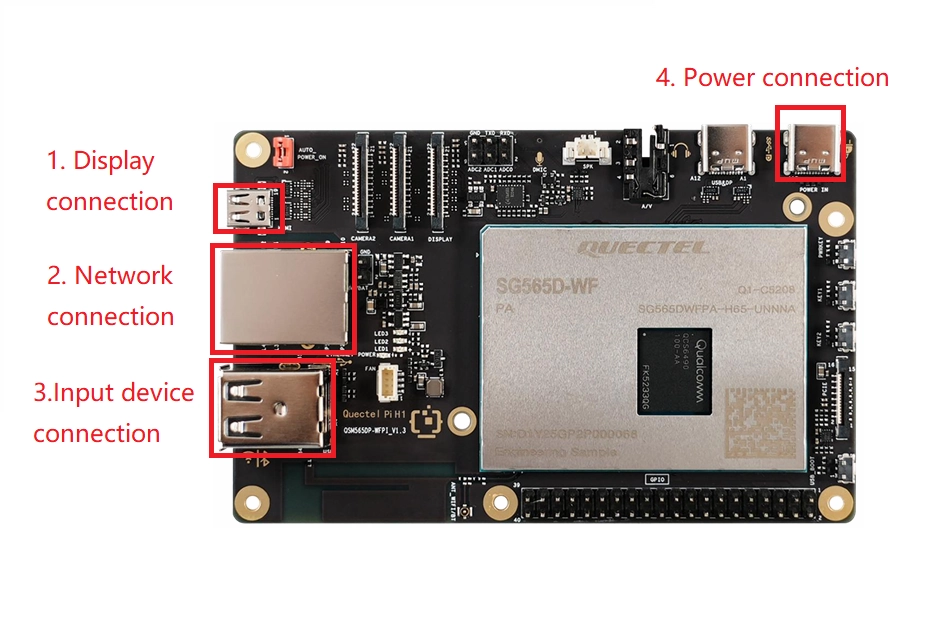
Display connection: Select one of the following connection methods according to the display interface. The figure above uses method 2 (HDMI connection) as an example;
Method 1 (USB-C DP connection): Connect one end of the USB-C DP display cable to Quectel Pi H1’s USB & DP interface and the other end to the display’s USB-C interface.
Method 2 (HDMI connection): Connect one end of the HDMI cable to Quectel Pi H1’s HDMI and the other end to the display’s HDMI, as shown above.
Method 3 (MIPI display): Make sure that the gold fingers of the flex cable and the contacts of the connector are on the same side. Insert the cable fully, then press down the latch to secure it, so as to avoid no display due to incorrect orientation. For details, see the MIPI.Network connection: Connect one end of the Gigabit network cable to the Quectel Pi H1’s Gigabit network port and the other end to the router’s network port (alternative: connect through Wi-Fi; see Wi-Fi configuration);
Input-device connection: Connect a USB keyboard and mouse to the Quectel Pi H1’s USB-A ports. For wireless input devices, insert the receiver into the USB ports.
Power connection: Connect the USB-A end of the power cable to the power adapter and the USB-C end to the power port on the Quectel Pi H1 marked POWER IN.
System startup
Turn on the display and make sure its input source is switched to the corresponding interface (such as USB-C or HDMI).
Connect power to the Quectel Pi H1. When the power LED (red) remains on and the system LED (green) flashes, the system is starting.
Wait approximately 1–2 minutes for the system login screen to appear on the display.
Note
If the header pins marked AUTO_POWER_ON are not shorted with a jumper cap during hardware connection, first press and hold PWRKEY on the right side of Quectel Pi H1, then connect power and hold it until the system starts.If the system fails to start normally, reflash the system image:
Power the Quectel Pi H1 with a compliant power adapter.
Connect the Quectel Pi H1 USB & DP interface to the computer.
Follow the System installation.
System login
For information about setting the username and password, see System login.
Note
The root account has no password by default. Please set the password before use.
If you open the Enterprise Login interface while creating a user and cannot exit, click Enterprise Login again to return to the user-creation screen.
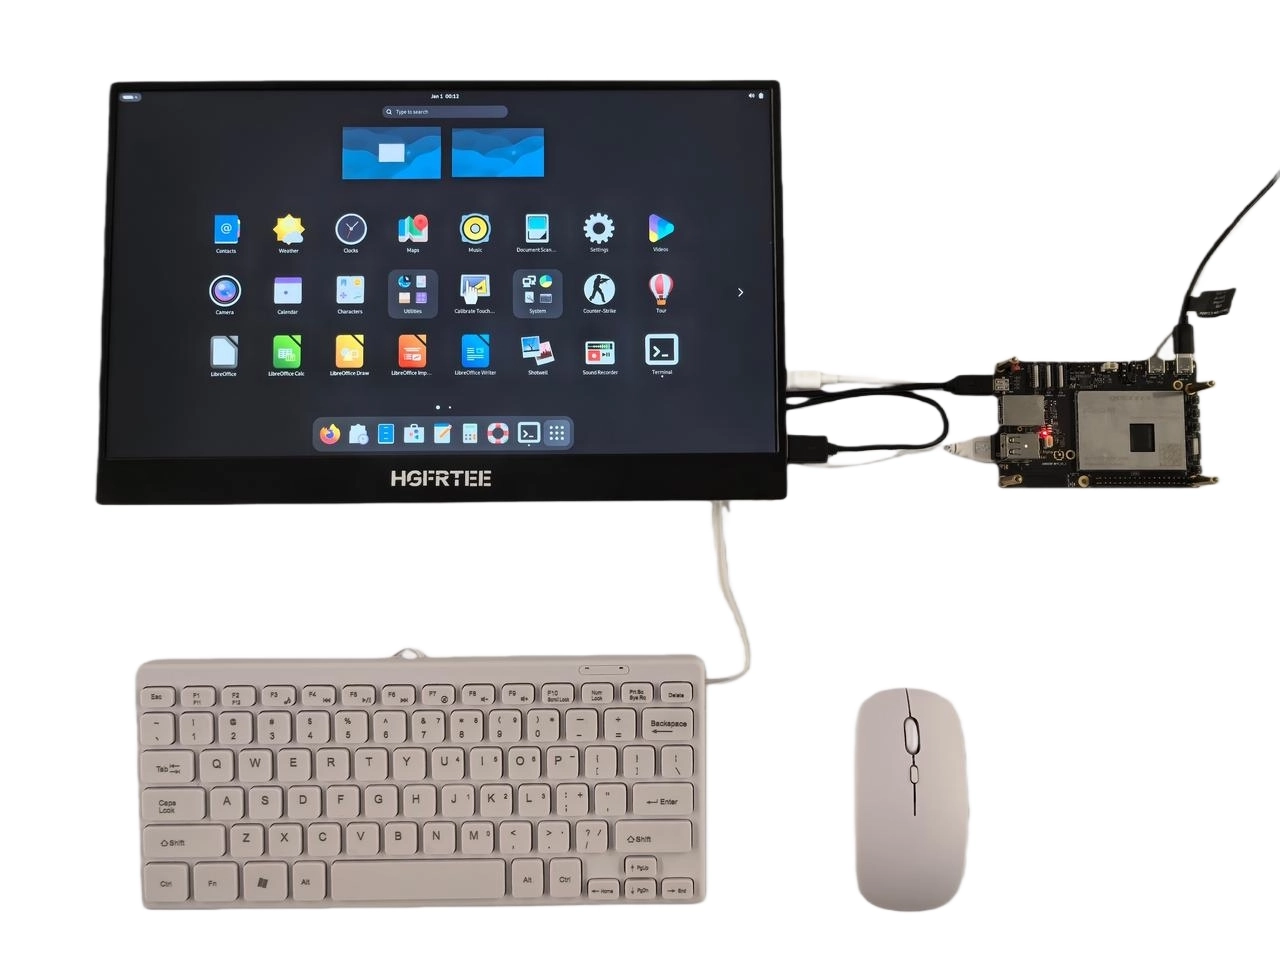
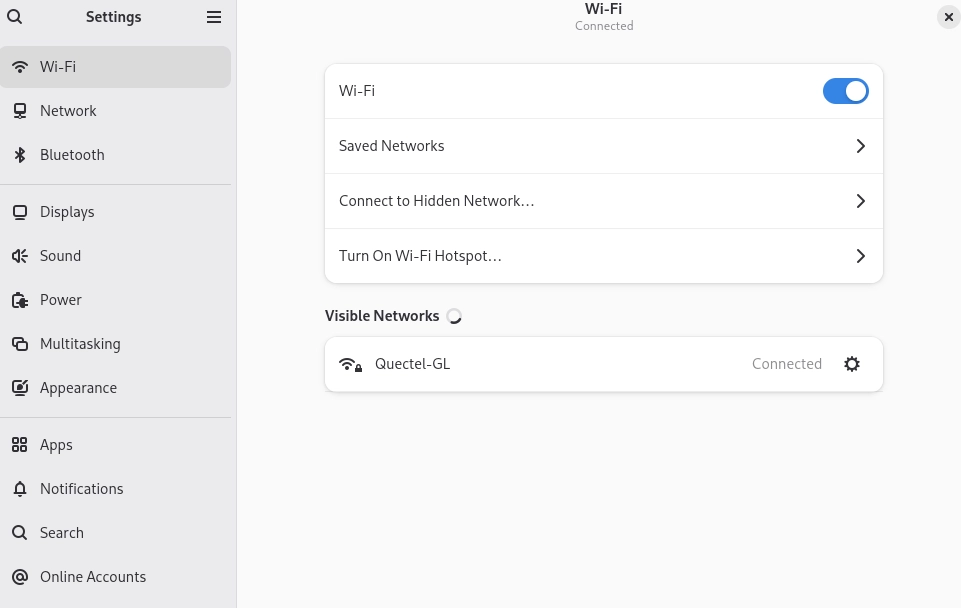
Network configuration
Select the Wi-Fi network and enter its password to connect.
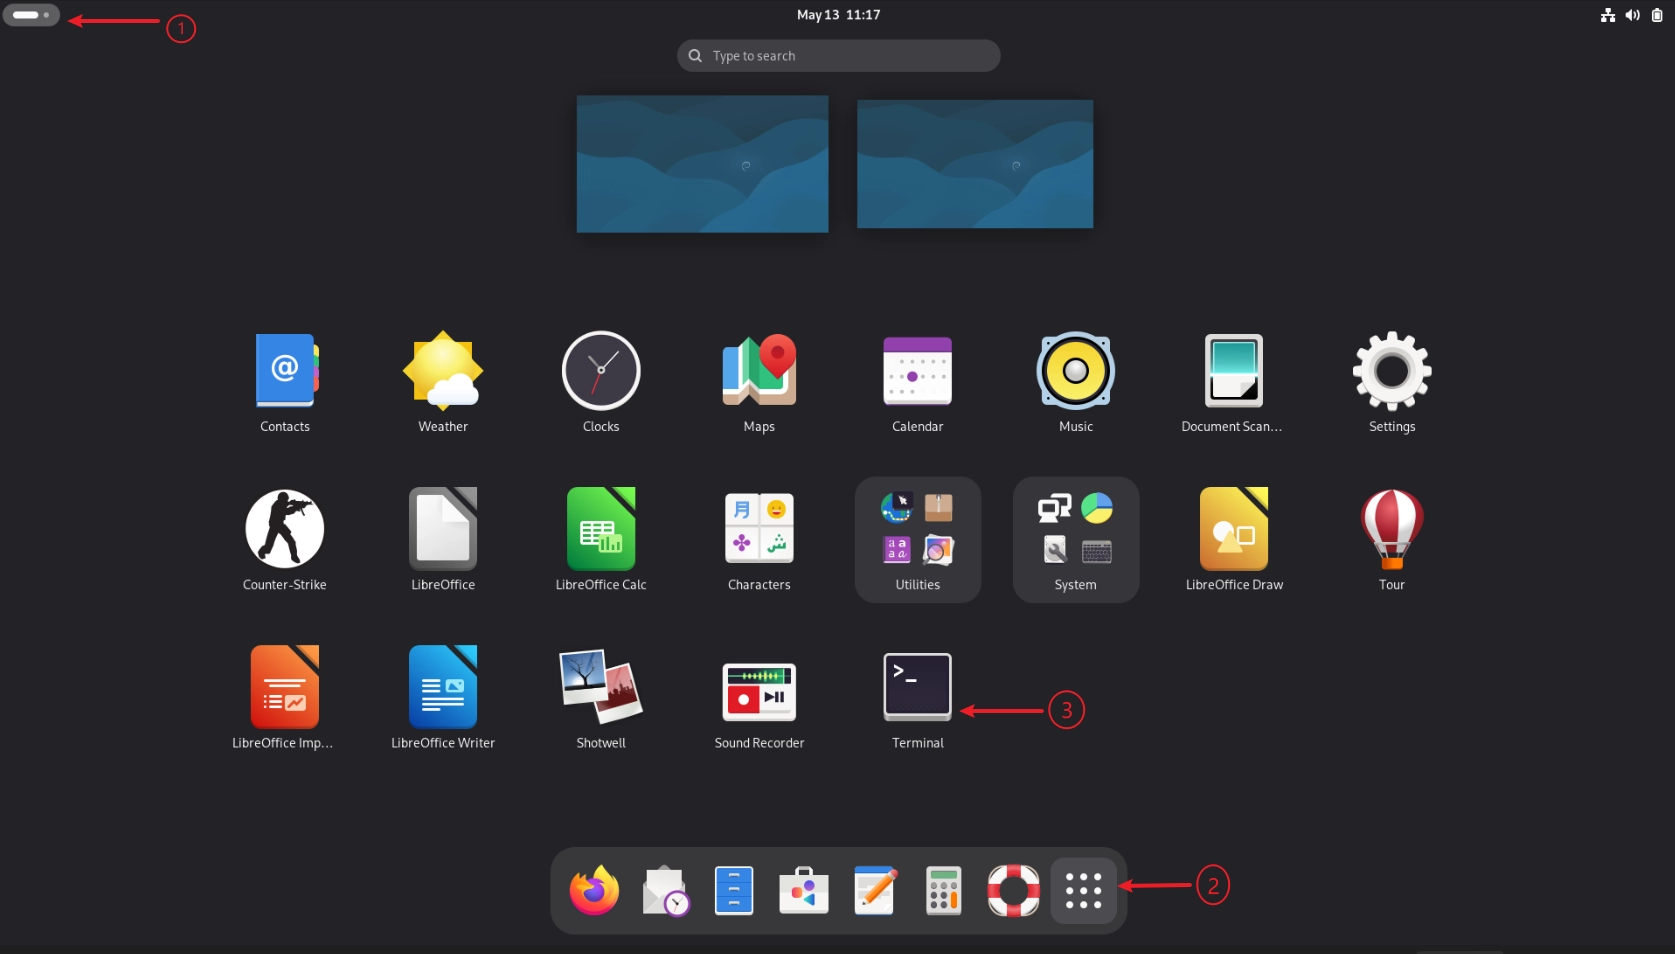
Open the terminal command line
Start the Quectel Pi H1 without a display
If the Quectel Pi H1 is not connected to a display, keyboard, or mouse, you can control it remotely from another computer.
To control the Quectel Pi H1 remotely, first connect it to a network, then access it using a client on another device. SSH provides remote access to the command-line terminal, while VNC provides remote access to the graphical desktop. If the device is not yet connected to the network, first use ADB to complete the initial network configuration.
For additional remote-access methods, see Device connection.
Method |
Description |
Prerequisites |
Tutorial link |
|---|---|---|---|
VNC |
Remote access to the graphical desktop |
Device is connected to the network |
|
SSH |
Remote access to the command-line terminal |
Device is connected to the network |
Note
During first startup, it is recommended to configure Wi-Fi through ADB first; you can then use VNC or SSH for daily operations.
Connect to the Quectel Pi H1 through ADB
This method allows you to remotely log in to and control the Quectel Pi H1 without an external display.
Download the ADB tools: platform-tools.
Install ADB
Extract the downloaded platform-tools to a specified folder on the computer.
Confirm that the ADB device is recognized
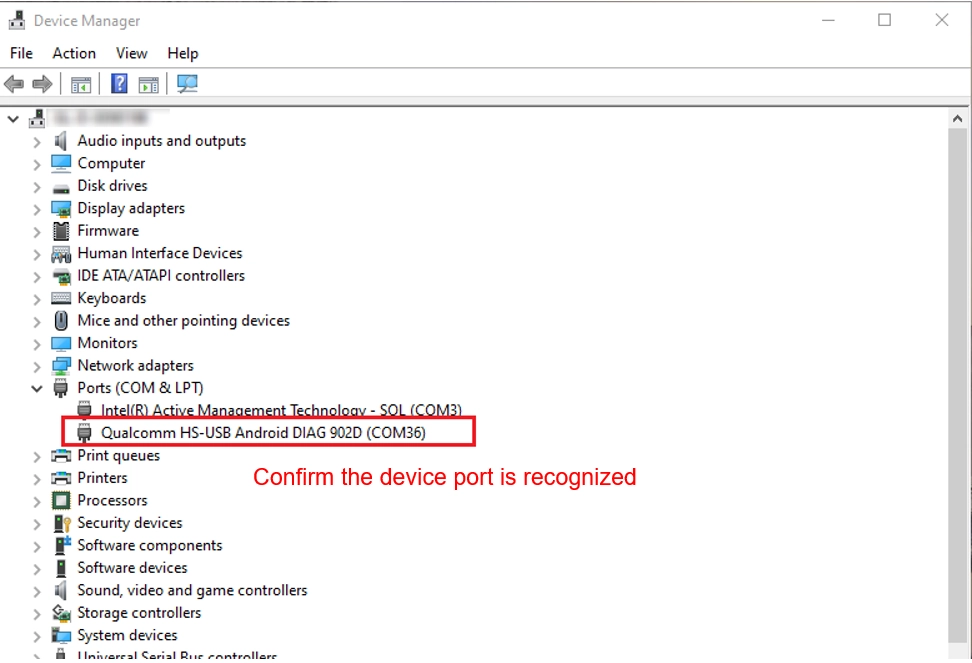
Connect the Quectel Pi H1 to the computer with a USB type-C cable, open a terminal in the ADB tools directory, and run the following command:
adb devices
Example output:
List of devices attached
790c2fb9        device
Note
If the device status is unauthorized, or no device is displayed, make sure that the USB cable supports data transfer rather than charging only, or try another USB port.
Connect to the device through ADB
adb shell
After the connection succeeds, operations are performed as the root user.
Create a regular user
The system provides only the root user by default. Creating a regular user for daily operations is recommended.
Create a user
The following example creates a user named pi; you can specify another username.
adduser pi
#pi is the name of the user being created
The system prompts you to set a password. Enter the password twice as instructed.
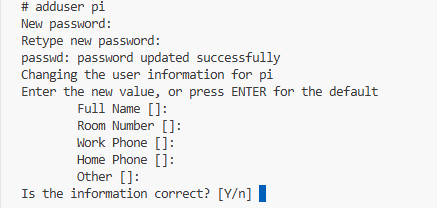
After the user is created, the system automatically creates /home/username as the user’s home directory. You can store personal files, project code, and other information in this directory.
Grant*sudo*privileges
usermod -aG sudo pi
Switch users
#verify the user
id pi

#switch user
su - pi

#test permissions
whoami
sudo whoami
#should output root; verify sudo privileges
Connect to Wi-Fi
The Quectel Pi H1 includes the qpi-config tool for managing Wi-Fi connections.
Scan nearby Wi-Fi networks
qpi-config wifi scan
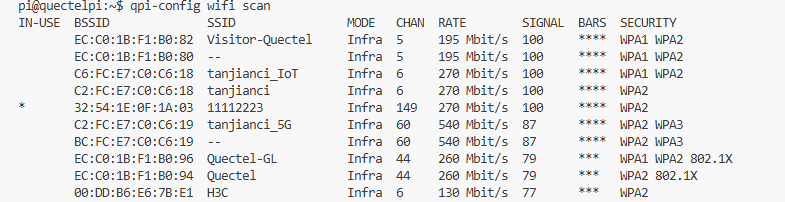
Connect to Wi-Fi
#connect to Wi-Fi
qpi-config wifi connect "your_Wi-Fi_name" "your_Wi-Fi_password"

#view saved Wi-Fi connections
qpi-config wifi show

#delete saved Wi-Fi connections
qpi-config wifi remove <connection uuid>

Verify network connectivity
ping www.google.com
Connect to the smart single-board computer through SSH
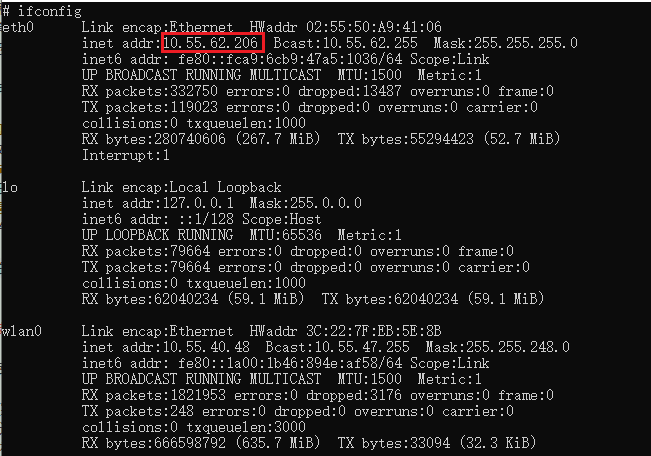
View the device IP address
Run ifconfig in the smart single-board computer’s terminal to obtain its IP address.
The device IP address in this example is 10.55.62.206.
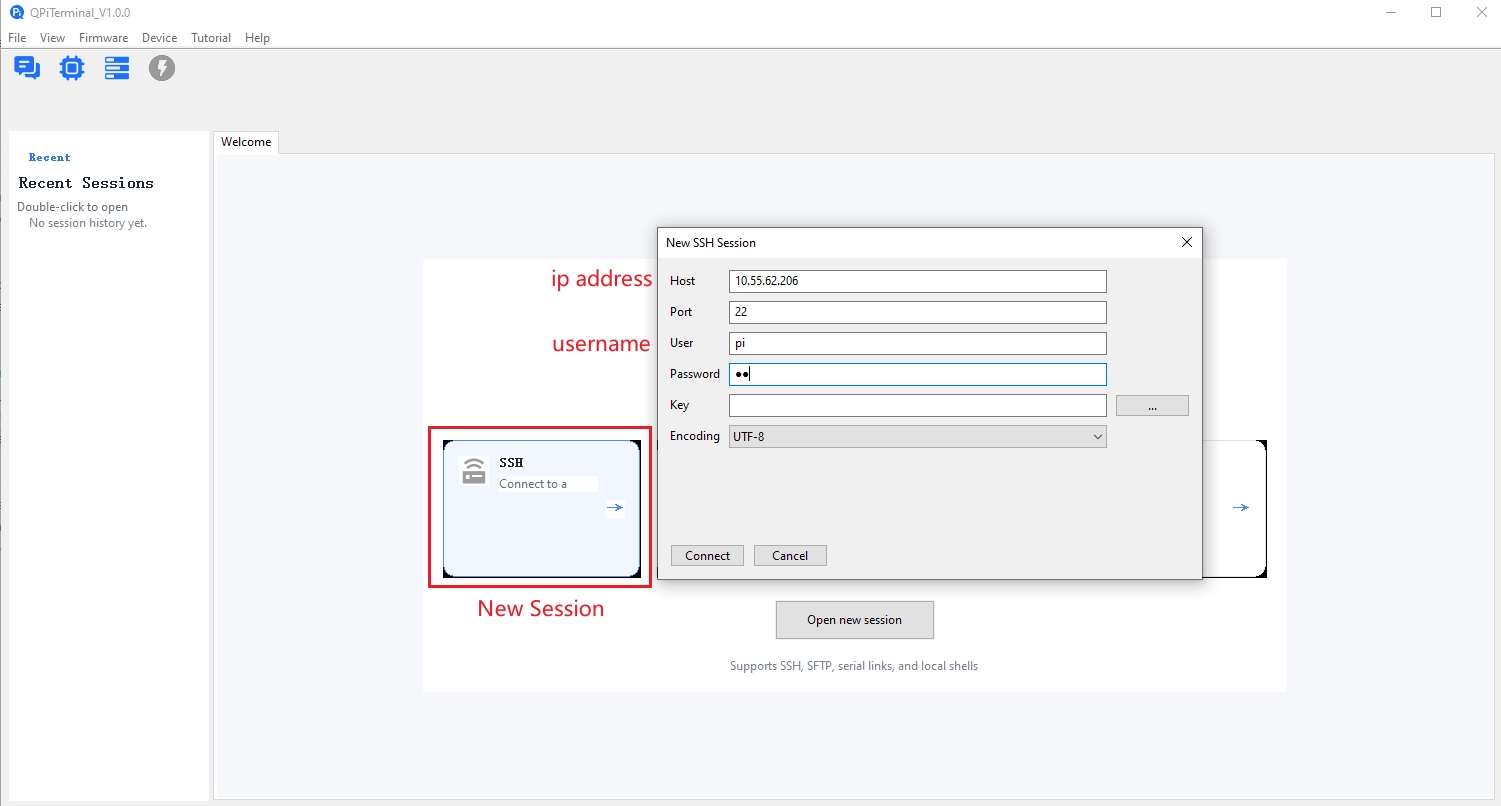
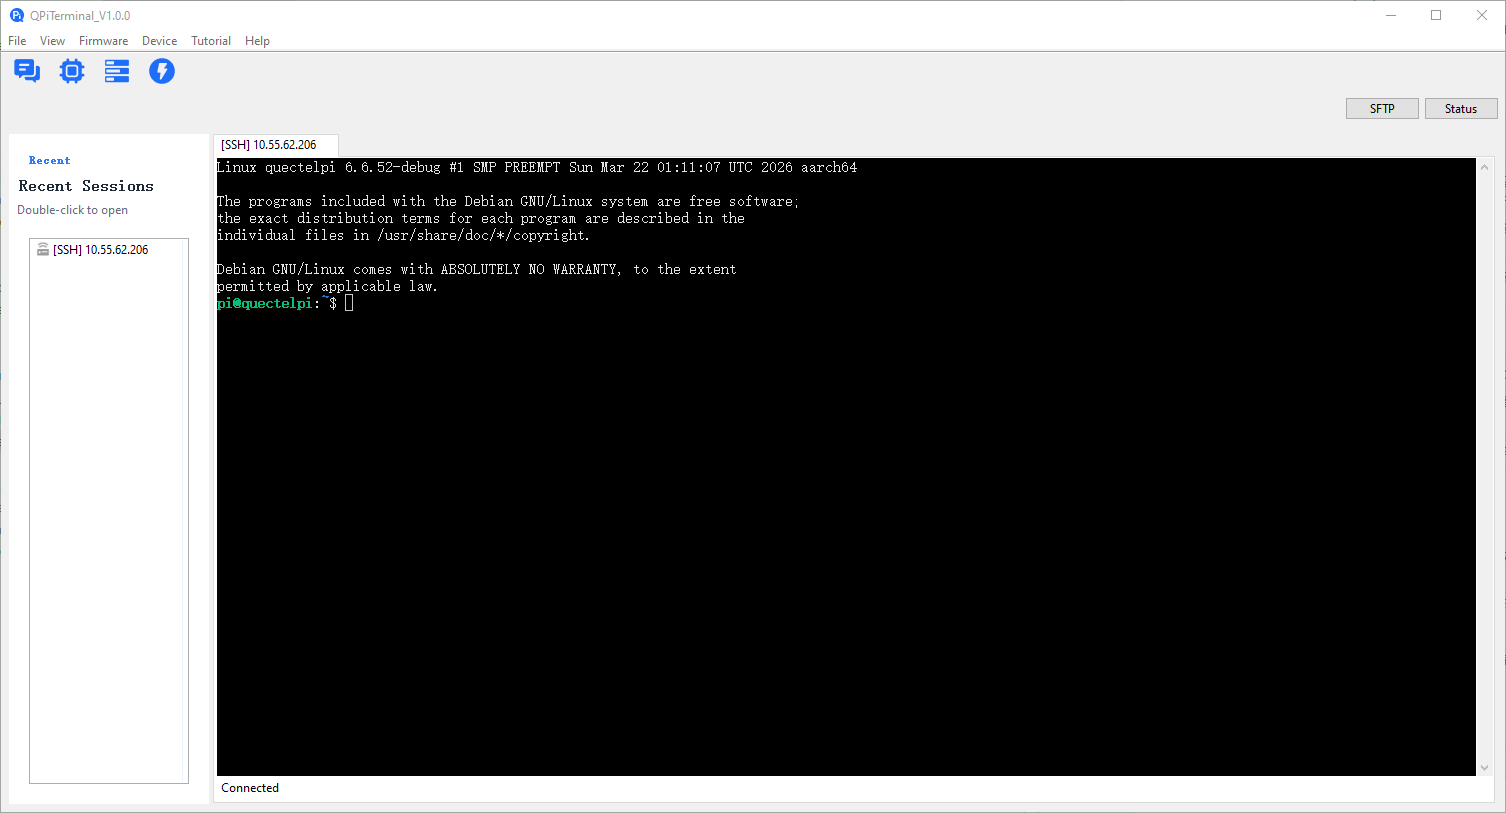
Connect to the smart single-board computer through SSH using QPiTerminal
Open QPiTerminal and create a SSH session. Enter the smart single-board computer’s IP address, username, and password, then click Connect.
System health check
After the system starts, use qpi-config in the terminal to quickly check the system status.
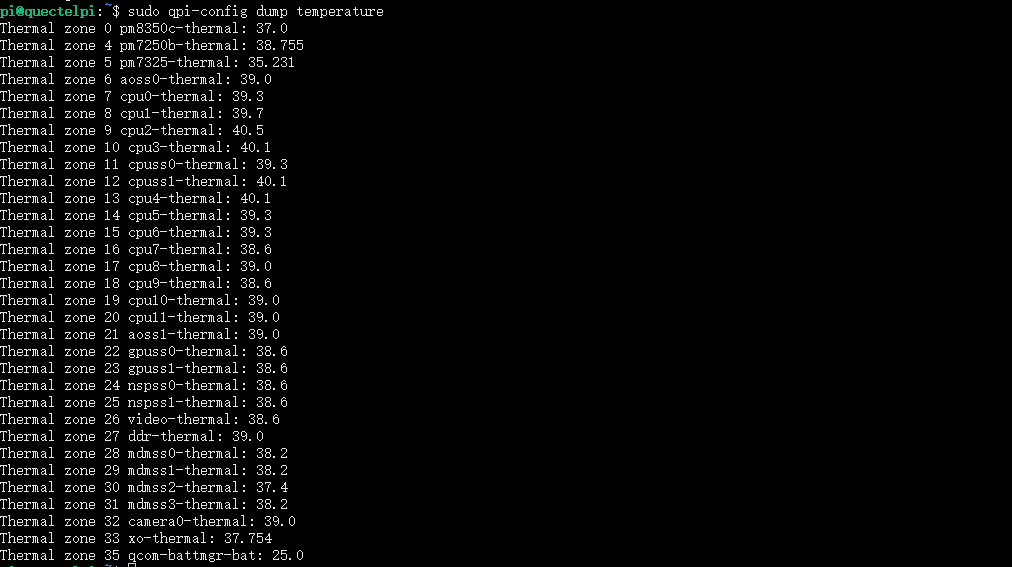
Check the temperature of each system module
sudo qpi-config dump temperature
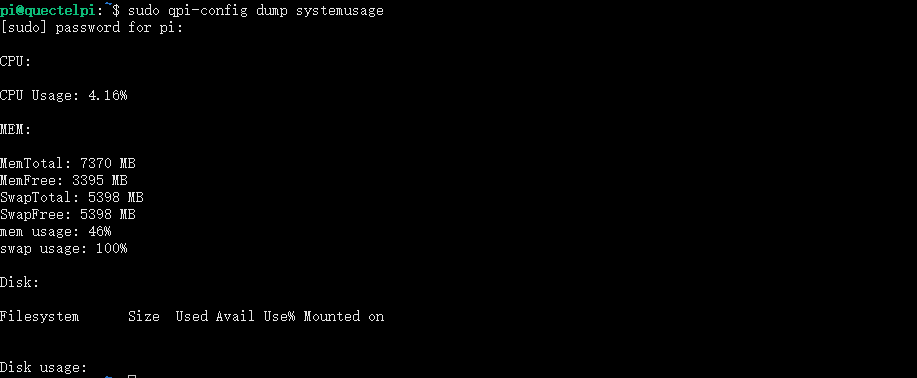
Check system CPU, memory, and storage status
sudo qpi-config dump systemusage
Network status check
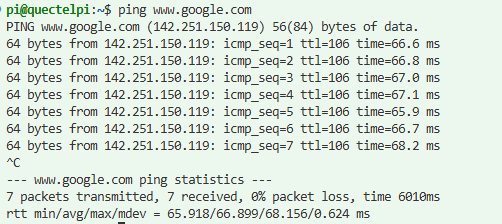
After connecting the device to the network through a network cable or Wi-Fi, use ping to verify that it can access the external network.
ping www.google.com
Example output for a successful connection:
PING www.google.com (142.251.150.119) 56(84) bytes of data.
64 bytes from 142.251.150.119: icmp_seq=1 ttl=106 time=66.6 ms
64 bytes from 142.251.150.119: icmp_seq=2 ttl=106 time=66.8 ms
64 bytes from 142.251.150.119: icmp_seq=3 ttl=106 time=67.0 ms
64 bytes from 142.251.150.119: icmp_seq=4 ttl=106 time=67.1 ms
64 bytes from 142.251.150.119: icmp_seq=5 ttl=106 time=65.9 ms
64 bytes from 142.251.150.119: icmp_seq=6 ttl=106 time=66.7 ms
64 bytes from 142.251.150.119: icmp_seq=7 ttl=106 time=68.2 ms
^C
--- www.google.com ping statistics ---
7 packets transmitted, 7 received, 0% packet loss, time 6010ms
rtt min/avg/max/mdev = 65.918/66.899/68.156/0.624 ms
Note
Identifier descriptions:
64 bytes from …: An ICMP response (reply) was received, indicating normal network connectivity
icmp_seq: Sequence number; increasing values indicate that responses continue to be received
ttl: Time to live; the normal range is generally 30–128
time: Round-trip latency; a smaller value indicates better network quality
0% packet loss: A 0% packet-loss rate, indicating that no packets were lost in this test
First Hello World program
Set up the development environment
After logging in to the Quectel Pi H1 Debian system, open a terminal window, enter the following command, and press Enter to install the required development environment.
sudo apt update && sudo apt install gcc make
Compile and run helloworld (C version)
Open the system terminal and run the following command to create hello.c.
touch hello.c
Run the following command to open nano in the hello.c editor.
sudo nano hello.c
Copy the following code to hello.c. Press Ctrl+O and Enter to save, then press Ctrl+X to exit the nano editor.
#include <stdio.h>
int main(void)
{
    printf("hello world\r\n");
    return 0;
}
Run the following command to compile the code:
gcc hello.c -o hello
Run the following command to execute the hello program:
./hello
The program output is as follows:
./hello
hello world
Compile and run helloworld (Python version)
In addition to C, you can quickly implement a Hello World program in Python. The Python environment is preinstalled, so no additional interpreter is required.
Open the system terminal and enter the following command to create hello.py.
touch hello.py
Open Files in the system, then in the Home directory, double-click hello.py.
Copy the following code and paste it into hello.py:
def main():
    print("Hello, World!")

if __name__ == "__main__":
    main()
Python is an interpreted language, so no compilation is required; execute it directly:
python3 hello.py
The program output is as follows:
python3 hello.py
Hello, World!
Purpose
A Hello World program can verify that the development environment has been set up successfully. Writing and running a simple C or Python program checks whether the compiler and runtime environment work correctly and also provides an introductory exercise in embedded development.
Safe power-off and restart
Quectel Pi H1 supports safe power-off or restart in three ways: through the graphical desktop interface, the command line, or a physical button.
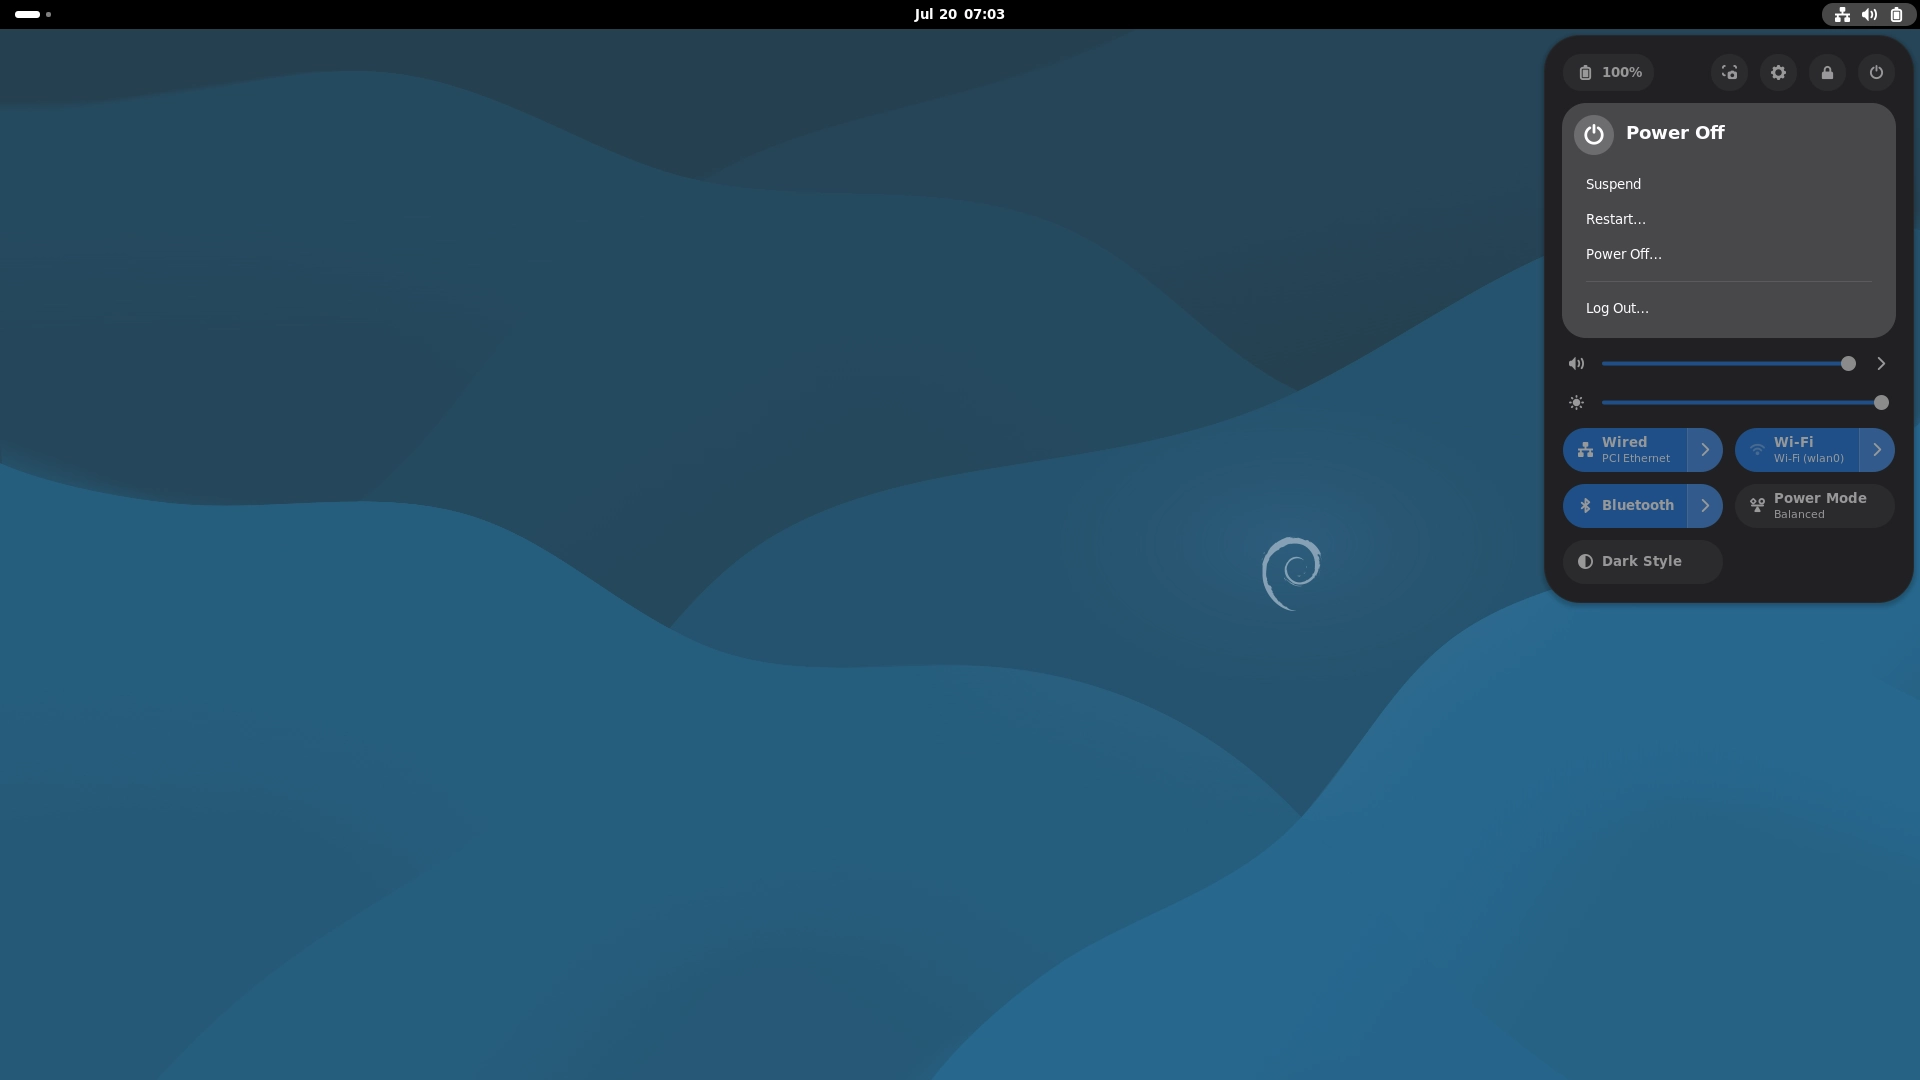
Power off through the graphical desktop interface
If you are using an external display in the desktop environment:
Click the system menu in the upper-right corner of the desktop.
Select Power Off or Restart.
Power off through the command line
Run the following commands in a terminal (local terminal, SSH, or ADB shell):
Power off
sudo poweroff
Restart
sudo reboot
Suggestions for further study
After completing the introductory operations, you can learn more about the following: