Application Basics
Introduction
This chapter provides end-to-end development guidance for Android application developers working with embedded hardware platforms (using the Quectel Pi smart main control board series as an example). It covers core operations including development environment setup, debugging tool usage, hardware-related API calls, and application deployment and startup. It aims to help developers quickly get started with embedded Android development, solve basic problems from environment configuration to application implementation, adapt to the special development requirements of embedded hardware, and lay a technical foundation for subsequent complex function development.
Development Environment
Preparation of Development Tools
Download and Installation of Android Studio
Official download address: Android Studio Official Website
Installation process
Download the corresponding installation package according to the operating system (Windows/macOS/Linux);
For Windows systems: Double-click the
.exeinstallation package to launch the setup wizard;For macOS systems: Mount the
.dmgimage and drag Android Studio to the Applications folder;For Linux systems: Extract the
.tar.gzpackage to the/optdirectory, and execute/opt/android-studio/bin/studio.shto start the installation.Check the core components “Android Studio” and “Android SDK”, select a non-system disk (it is recommended to reserve ≥20 GB of space) as the installation path, and complete the basic installation;
Select the “Standard” configuration for the first startup, and wait for the automatic download of the SDK and toolchain to complete.
Embedded Hardware Driver Configuration
For Quectel Pi series hardware, additional driver configuration is required:
Windows systems
Download the official Quectel hardware driver package, double-click the installer, and complete the configuration according to the wizard.
Linux or macOS systems
The system usually has a built-in universal USB driver, and the hardware can be automatically recognized after connection, generally no need to manually install additional drivers.
Driver verification: Connect the hardware to the computer, execute the
lsusbcommand in the Windows Device Manager or Linux terminal. If the corresponding device can be recognized, the driver configuration is successful.
NDK Configuration (for underlying hardware API calls)
Open Android Studio, go to
File > Settings > Appearance & Behavior > System Settings > Android SDK, and switch to theSDK Toolstab.Check
Show Package Details,NDK (Side by side)andCMake, select the corresponding version and click “Apply” to complete the download and installation.Configure the NDK path in the project’s
local.propertiesfile:
ndk.dir=SDK installation path/ndk/corresponding version number
Project Environment Initialization
Create a new Android project, select the “Empty Activity” template, configure the project name and package name. It is recommended that the minimum compatible Android version be ≥ Android 10 (to adapt to embedded hardware).
Import related dependency packages such as the Quectel hardware SDK in the
build.gradle(Module level) file (this step is optional).
APK Development
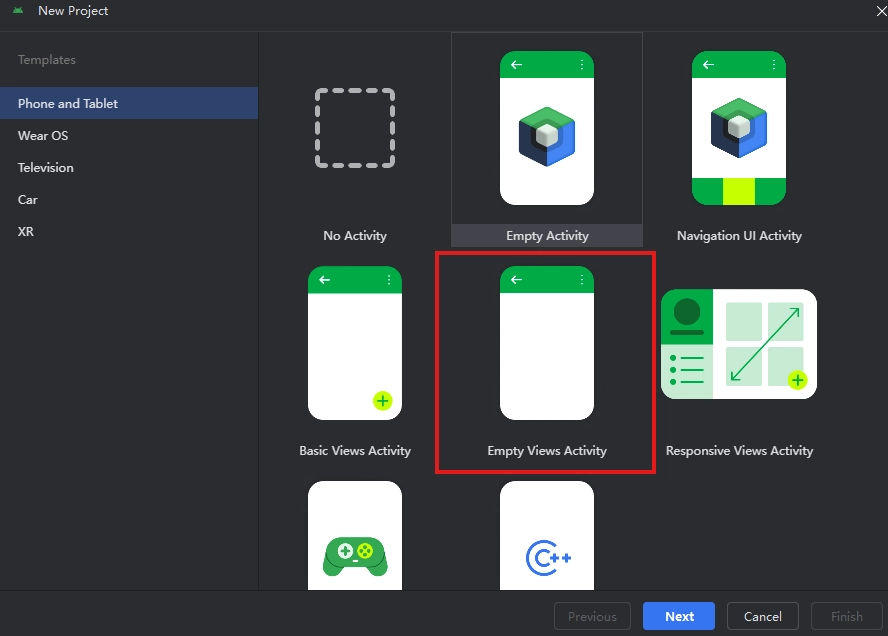
Launch Android Studio: Click “New Project” to create a new project. When selecting the project template, it is recommended to choose the most concise Empty Views Activity template.
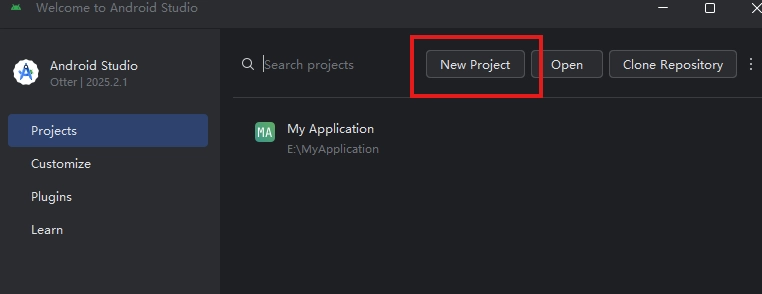
Note: If you select the “Empty Activity” template, a Compose UI project will be generated.
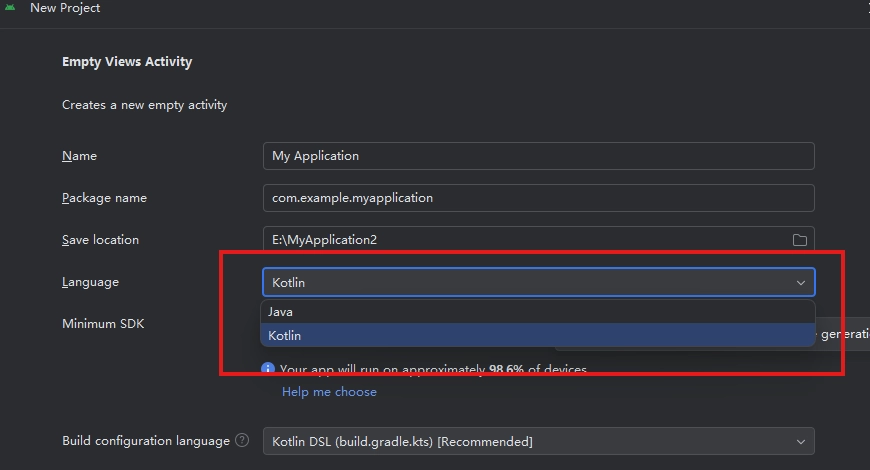
Select language: Select the development language in this step. Even if Kotlin is selected, the project can still be developed using Java, and Android projects fully support mixed development of Java and Kotlin.
Download dependencies and SDK: After completing the above steps, Android Studio will automatically open the project and download Gradle and required dependencies. If you are prompted “SDK missing” on the first startup, click “Next” to automatically download the Android SDK. Please confirm the SDK installation path and wait for the download to complete. The build time depends on the network conditions.
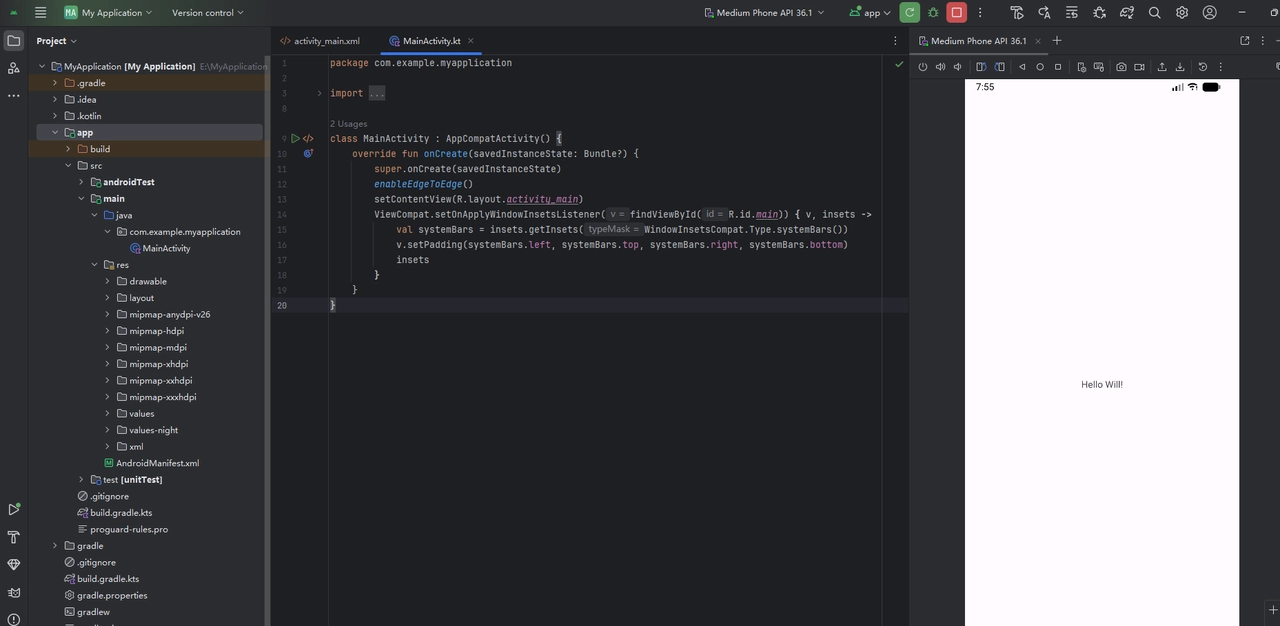
Build and run: After the Gradle build is completed, enter the main interface, and the system has generated the basic demo code. If there is no error and the green “Run” button at the top is available, the build is normal. Click this button to compile the project and start the emulator. In addition, you can also use the
adb connectcommand to connect to a real device for running.
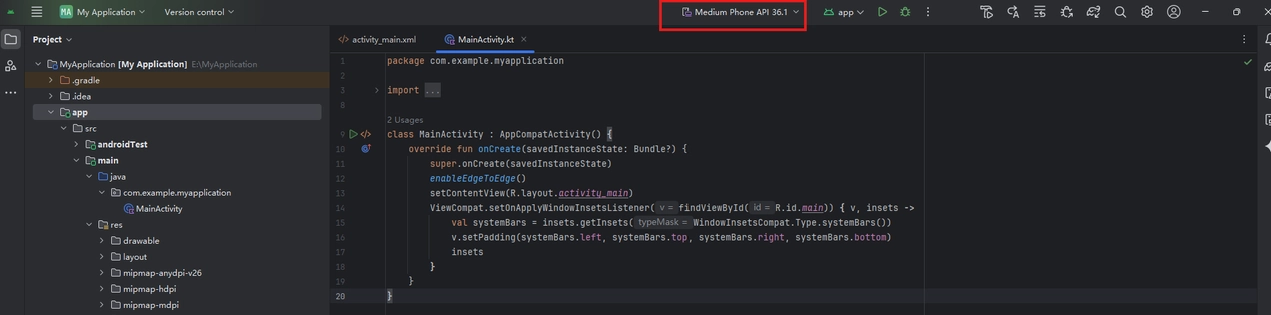
Successful operation: At this point, the application has successfully run on the emulator, displaying a simple welcome interface, and you can start development.
Basic API Examples
GPIO Control API (Core Function of Embedded Hardware)
Introduction to GPIO
GPIO (General-Purpose Input/Output) is a fundamental and crucial concept in embedded systems and hardware development. On Android devices, it serves as a “bridge” between the system and the external physical world. GPIO control in embedded Android needs to be combined with hardware drivers. The following is a basic example based on system file operations (taking GPIO 12 as an example).
Permission Configuration
Add hardware access permissions in AndroidManifest.xml:
<uses-permission android:name="android.permission.WRITE_EXTERNAL_STORAGE"/>
<uses-permission android:name="android.permission.READ_EXTERNAL_STORAGE"/>
Java Code Implementation
Reading and writing files under /sys/class/gpio through Java code usually requires root permission. Therefore, performing these operations on a regular Android phone is very difficult, and this method is usually only applicable to devices that have obtained root permission or development boards designed specifically for developers.
import java.io.BufferedWriter;
import java.io.File;
import java.io.FileWriter;
import java.io.IOException;
public class GpioManager {
   //GPIO operation base path
    private static final String GPIO_BASE_PATH = "/sys/class/gpio/";
    private final int gpioNum;
    public GpioManager(int gpioNum) {
        this.gpioNum = gpioNum;
        exportGpio();

    }
    private void exportGpio() {
        try {
            File exportFile = new File(GPIO_BASE_PATH + "export");
            BufferedWriter writer = new BufferedWriter(new FileWriter(exportFile));
            writer.write(String.valueOf(gpioNum));
            writer.close();
            //Default to output mode
            setGpioDirection("out");
        } catch (IOException e) {
            e.printStackTrace();
        }
    }
    /**
     * Set GPIO direction (in/out)
     * @param direction Direction parameter
     */
    public void setGpioDirection(String direction) {
        try {
            File dirFile = new File(GPIO_BASE_PATH + "gpio" + gpioNum + "/direction");
            BufferedWriter writer = new BufferedWriter(new FileWriter(dirFile));
            writer.write(direction);
            writer.close();
        } catch (IOException e) {
            e.printStackTrace();
        }
    }
    /**
     * Control GPIO level (high level 1/low level 0)
     * @param value Level value
     */
    public void setGpioValue(int value) {
        try {
            File valueFile = new File(GPIO_BASE_PATH + "gpio" + gpioNum + "/value");
            BufferedWriter writer = new BufferedWriter(new FileWriter(valueFile));
            writer.write(String.valueOf(value));
            writer.close();
        } catch (IOException e) {
            e.printStackTrace();
        }
    }
    /**
     * Release GPIO pin
     */
    public void unexportGpio() {
        try {
            File unexportFile = new File(GPIO_BASE_PATH + "unexport");
            BufferedWriter writer = new BufferedWriter(new FileWriter(unexportFile));
            writer.write(String.valueOf(gpioNum));
            writer.close();
        } catch (IOException e) {
            e.printStackTrace();
        }
    }
}
Calling Example
//Initialize GPIO 12 pin
GpioManager gpioManager = new GpioManager(12);
//Set GPIO to high level
gpioManager.setGpioValue(1);
//Release GPIO after business logic is executed
gpioManager.unexportGpio();
NDK Code Implementation
Since the Java/Kotlin code of a regular application runs at the Android application layer and cannot directly operate hardware, it is necessary to bridge through JNI (Java Native Interface). Call the Native layer code written in C/C++ to implement GPIO control (read/write /sys/class/gpio files or directly operate /dev/mem registers), and compile the C/C++ code into a .so dynamic link library for the Java layer to call through NDK.
JNI Layer Code Example
#include <jni.h>
#include <stdio.h>
#include <fcntl.h>
#include <unistd.h>
#include <string.h>
#define GPIO_BASE_PATH "/sys/class/gpio/"
//Export GPIO pin
static int gpio_export(int pin) {
    char buffer[64];
    int fd = open(GPIO_BASE_PATH "export", O_WRONLY);
    if (fd < 0) {
        perror("Failed to open export file");
        return -1;
    }
    snprintf(buffer, sizeof(buffer), "%d", pin);
    write(fd, buffer, strlen(buffer));
    close(fd);
    return 0;
}

//Release GPIO pin
static int gpio_unexport(int pin) {
    char buffer[64];
    int fd = open(GPIO_BASE_PATH "unexport", O_WRONLY);
    if (fd < 0) {
        perror("Failed to open unexport file");
        return -1;
    }
    snprintf(buffer, sizeof(buffer), "%d", pin);
    write(fd, buffer, strlen(buffer));
    close(fd);
    return 0;
}

//Set GPIO direction (in/out)
static int gpio_set_direction(int pin, const char *dir) {
    char buffer[64];
    snprintf(buffer, sizeof(buffer), GPIO_BASE_PATH "gpio%d/direction", pin);
    int fd = open(buffer, O_WRONLY);
    if (fd < 0) {
        perror("Failed to open direction file");
        return -1;
    }
    write(fd, dir, strlen(dir));
    close(fd);
    return 0;
}

//Set GPIO level (1/0)
static int gpio_set_value(int pin, int value) {
    char buffer[64];
    snprintf(buffer, sizeof(buffer), GPIO_BASE_PATH "gpio%d/value", pin);
    int fd = open(buffer, O_WRONLY);
    if (fd < 0) {
        perror("Failed to open value file");
        return -1;
    }
    char val_str[2] = {value + '0', '\0'};
    write(fd, val_str, strlen(val_str));
    close(fd);
    return 0;
}

//JNI method: Initialize GPIO
JNIEXPORT jint JNICALL
Java_com_example_gpiocontrol_MainActivity_gpioInit(JNIEnv *env, jobject thiz, jint pin) {
    if (gpio_export(pin) < 0) return -1;
    if (gpio_set_direction(pin, "out") < 0) return -1;
    return 0;
}

//JNI method: Set GPIO level
JNIEXPORT jint JNICALL
Java_com_example_gpiocontrol_MainActivity_gpioSetValue(JNIEnv *env, jobject thiz, jint pin, jint value) {
    return gpio_set_value(pin, value);
}

//JNI method: Release GPIO
JNIEXPORT jint JNICALL
Java_com_example_gpiocontrol_MainActivity_gpioRelease(JNIEnv *env, jobject thiz, jint pin) {
    return gpio_unexport(pin);
}
CMakeLists Configuration
cmake_minimum_required(VERSION 3.22.1)
project("gpiocontrol")
# Add shared library
add_library(
        gpiocontrol
        SHARED
        gpio_control.c)
# Link system library
target_link_libraries(
        gpiocontrol
        log)
Java Layer Code Call
package com.example.gpiocontrol;
import androidx.appcompat.app.AppCompatActivity;
import android.os.Bundle;
import android.view.View;
import android.widget.Button;
public class MainActivity extends AppCompatActivity {
    //Load Native library
    static {
        System.loadLibrary("gpiocontrol");
    }
    //Declare native methods
    private native int gpioInit(int pin);
    private native int gpioSetValue(int pin, int value);
    private native int gpioRelease(int pin);
    private static final int GPIO_PIN = 12; //Controlled GPIO pin
    @Override
    protected void onCreate(Bundle savedInstanceState) {
        super.onCreate(savedInstanceState);
        setContentView(R.layout.activity_main);
        //Initialize GPIO
        gpioInit(GPIO_PIN);
        //High level button
        Button btnHigh = findViewById(R.id.btn_high);
        btnHigh.setOnClickListener(v -> gpioSetValue(GPIO_PIN, 1));
        //Low level button
        Button btnLow = findViewById(R.id.btn_low);
        btnLow.setOnClickListener(v -> gpioSetValue(GPIO_PIN, 0));
    }
    @Override
    protected void onDestroy() {
        super.onDestroy();
        //Release GPIO
        gpioRelease(GPIO_PIN);
    }
}
Android App Directly Calling Shell (Runtime.exec)
Execute Shell commands through Runtime.getRuntime().exec() in Java/Kotlin code, read and write GPIO control files in the /sys/class/gpio directory with su permission, and implement level control. This method requires the development board to have Root permission.
Core Code Example
//Initialize GPIO (export pin + set output direction)
        try {
            execShellCommand("su -c echo " + GPIO_PIN + " > /sys/class/gpio/export");
            execShellCommand("su -c echo out > /sys/class/gpio/gpio" + GPIO_PIN + "/direction");
        } catch (IOException e) {
            e.printStackTrace();
        }
        //High level button
        Button btnHigh = findViewById(R.id.btn_high);
        btnHigh.setOnClickListener(v -> {
            try {
                execShellCommand("su -c echo 1 > /sys/class/gpio/gpio" + GPIO_PIN + "/value");
            } catch (IOException e) {
                e.printStackTrace();
            }
        });
        //Low level button
        Button btnLow = findViewById(R.id.btn_low);
        btnLow.setOnClickListener(v -> {
            try {
                execShellCommand("su -c echo 0 > /sys/class/gpio/gpio" + GPIO_PIN + "/value");
            } catch (IOException e) {
                e.printStackTrace();
            }
        });
    /**
     * Execute Shell command
     */
    private void execShellCommand(String command) throws IOException {
        Runtime.getRuntime().exec(command);
    }
Vendor-Provided Dedicated API or Jar Package
Most vendors will encapsulate standardized Java APIs (provided in the form of Jar packages or SDKs) based on underlying drivers. Developers can obtain the corresponding SDK from the vendor and integrate it into the Android application, and then directly call the encapsulated API to control GPIO without paying attention to the specific implementation of underlying hardware operations.
Camera API (Based on Camera2 Native API)
The following is an implementation example based on the Android native Camera2 API, adapted to the single-camera scenario of embedded devices, supporting preview and photo taking functions.
Dependency Configuration
Camera2 is an Android native API and does not require third-party dependencies. It is only necessary to confirm in build.gradle (Module level) that the minimum compatible version is not lower than Android 5.0 (API 21).
Permission and Layout Configuration
Permission declaration (AndroidManifest.xml):
<uses-permission android:name="android.permission.CAMERA"/>
<uses-permission android:name="android.permission.WRITE_EXTERNAL_STORAGE"/>
<uses-permission android:name="android.permission.READ_EXTERNAL_STORAGE"/>
<-- Camera hardware features -->
<uses-feature android:name="android.hardware.camera.any" android:required="true"/>
<uses-feature android:name="android.hardware.camera.autofocus" android:required="false"/>
Layout file (activity_camera2.xml):
UseTextureViewas the preview carrier, adapted to the screen size of embedded devices:
<?xml version="1.0" encoding="utf-8"?>
<androidx.constraintlayout.widget.ConstraintLayout
    xmlns:android="http://schemas.android.com/apk/res/android"
    xmlns:app="http://schemas.android.com/apk/res-auto"
    android:layout_width="match_parent"
    android:layout_height="match_parent">
    <!-- Camera preview view -->
    <TextureView
        android:id="@+id/textureView"
        android:layout_width="match_parent"
        android:layout_height="match_parent"
        app:layout_constraintBottom_toBottomOf="parent"
        app:layout_constraintEnd_toEndOf="parent"
        app:layout_constraintStart_toStartOf="parent"
        app:layout_constraintTop_toTopOf="parent" />
    <!-- Photo button -->
    <Button
        android:id="@+id/takePhotoBtn"
        android:layout_width="80dp"
        android:layout_height="80dp"
        android:layout_marginBottom="30dp"
        android:text="Take Photo"
        app:layout_constraintBottom_toBottomOf="parent"
        app:layout_constraintEnd_toEndOf="parent"
        app:layout_constraintStart_toStartOf="parent" />
</androidx.constraintlayout.widget.ConstraintLayout>
Code Implementation
public class Camera2Activity extends AppCompatActivity {
    //Screen rotation angle mapping
    private static final SparseIntArray ORIENTATIONS = new SparseIntArray();
    static {
        ORIENTATIONS.append(Surface.ROTATION_0, 90);
        ORIENTATIONS.append(Surface.ROTATION_90, 0);
        ORIENTATIONS.append(Surface.ROTATION_180, 270);
        ORIENTATIONS.append(Surface.ROTATION_270, 180);
    }
    //Core components
    private TextureView textureView;
    private Button takePhotoBtn;
    private CameraManager cameraManager;
    private CameraDevice cameraDevice;
    private CameraCaptureSession cameraCaptureSession;
    private CaptureRequest.Builder previewRequestBuilder;
    private Size previewSize;
    private ImageReader imageReader;
    private Handler backgroundHandler;
    private HandlerThread backgroundThread;
    //Camera ID (default rear)
    private String cameraId;
    //Photo save path
    private static final String PHOTO_SAVE_PATH = "/sdcard/DCIM/Camera2/";
    @Override
    protected void onCreate(Bundle savedInstanceState) {
        super.onCreate(savedInstanceState);
        setContentView(R.layout.activity_camera2);
        initView();
        initBackgroundThread();
        initCameraManager();
        createPhotoDir();
        //Monitor TextureView status
        textureView.setSurfaceTextureListener(new TextureView.SurfaceTextureListener() {
            @Override
            public void onSurfaceTextureAvailable(SurfaceTexture surface, int width, int height) {
                if (checkPermissions()) {
                    openCamera(width, height);
                } else {
                    ActivityCompat.requestPermissions(Camera2Activity.this,
                            new String[]{Manifest.permission.CAMERA, Manifest.permission.WRITE_EXTERNAL_STORAGE}, 1001);
                }
            }
            @Override
            public void onSurfaceTextureSizeChanged(SurfaceTexture surface, int width, int height) {
                configureTransform(width, height);
            }
            @Override
            public boolean onSurfaceTextureDestroyed(SurfaceTexture surface) {
                return false;
            }
            @Override
            public void onSurfaceTextureUpdated(SurfaceTexture surface) {}
        });
        //Photo button click event
        takePhotoBtn.setOnClickListener(v -> takePhoto());
    }
    /**
     * Initialize view controls
     */
    private void initView() {
        textureView = findViewById(R.id.textureView);
        takePhotoBtn = findViewById(R.id.takePhotoBtn);
    }
    /**
     * Initialize background thread (for processing camera asynchronous operations)
     */
    private void initBackgroundThread() {
        backgroundThread = new HandlerThread("Camera2BackgroundThread");
        backgroundThread.start();
        backgroundHandler = new Handler(backgroundThread.getLooper());
    }
    /**
     * Initialize camera manager
     */
    private void initCameraManager() {
        cameraManager = (CameraManager) getSystemService(Context.CAMERA_SERVICE);
        try {
            //Get rear camera ID
            for (String id : cameraManager.getCameraIdList()) {
                CameraCharacteristics characteristics = cameraManager.getCameraCharacteristics(id);
                Integer facing = characteristics.get(CameraCharacteristics.LENS_FACING);
                if (facing != null && facing == CameraCharacteristics.LENS_FACING_BACK) {
                    cameraId = id;
                    //Get preview size
                    StreamConfigurationMap map = characteristics.get(CameraCharacteristics.SCALER_STREAM_CONFIGURATION_MAP);
                    if (map != null) {
                        previewSize = map.getOutputSizes(SurfaceTexture.class)[0];
                        //Initialize ImageReader for taking photos (JPEG format, cache 1 at most)
                        imageReader = ImageReader.newInstance(previewSize.getWidth(), previewSize.getHeight(),
                                ImageFormat.JPEG, 1);
                        imageReader.setOnImageAvailableListener(reader -> {
                            //Process the taken photo
                            Image image = reader.acquireNextImage();
                            savePhoto(image);
                            image.close();
                        }, backgroundHandler);
                    }
                    break;
                }
            }
        } catch (CameraAccessException e) {
            e.printStackTrace();
            Toast.makeText(this, "Failed to initialize camera", Toast.LENGTH_SHORT).show();
        }
    }
    /**
     * Create photo save directory
     */
    private void createPhotoDir() {
        File dir = new File(PHOTO_SAVE_PATH);
        if (!dir.exists()) {
            boolean isCreated = dir.mkdirs();
            if (!isCreated) {
                Toast.makeText(this, "Failed to create photo directory", Toast.LENGTH_SHORT).show();
            }
        }
    }
    /**
     * Check permissions (camera + storage)
     */
    private boolean checkPermissions() {
        return ActivityCompat.checkSelfPermission(this, Manifest.permission.CAMERA) == PackageManager.PERMISSION_GRANTED
                && ActivityCompat.checkSelfPermission(this, Manifest.permission.WRITE_EXTERNAL_STORAGE) == PackageManager.PERMISSION_GRANTED;
    }
    /**
     * Open camera
     */
    private void openCamera(int width, int height) {
        try {
            //Secondary permission verification
            if (ActivityCompat.checkSelfPermission(this, Manifest.permission.CAMERA) != PackageManager.PERMISSION_GRANTED) {
                return;
            }
            //Open camera (asynchronous callback)
            cameraManager.openCamera(cameraId, new CameraDevice.StateCallback() {
                @Override
                public void onOpened(@NonNull CameraDevice camera) {
                    cameraDevice = camera;
                    //Camera opened successfully, create preview session
                    createCameraPreviewSession();
                }
                @Override
                public void onDisconnected(@NonNull CameraDevice camera) {
                    camera.close();
                    cameraDevice = null;
                }
                @Override
                public void onError(@NonNull CameraDevice camera, int error) {
                    camera.close();
                    cameraDevice = null;
                    Toast.makeText(Camera2Activity.this, "Failed to open camera: " + error, Toast.LENGTH_SHORT).show();
                }
            }, backgroundHandler);
        } catch (CameraAccessException e) {
            e.printStackTrace();
        }
    }
    /**
     * Create camera preview session
     */
    private void createCameraPreviewSession() {
        try {
            SurfaceTexture texture = textureView.getSurfaceTexture();
            //Set preview buffer size
            texture.setDefaultBufferSize(previewSize.getWidth(), previewSize.getHeight());
            //Create preview Surface
            Surface previewSurface = new Surface(texture);
            //Build preview request
            previewRequestBuilder = cameraDevice.createCaptureRequest(CameraDevice.TEMPLATE_PREVIEW);
            previewRequestBuilder.addTarget(previewSurface);
            //Create photo session (including preview and ImageReader Surface)
            List<Surface> surfaces = new ArrayList<>();
            surfaces.add(previewSurface);
            surfaces.add(imageReader.getSurface());
            cameraDevice.createCaptureSession(surfaces, new CameraCaptureSession.StateCallback() {
                @Override
                public void onConfigured(@NonNull CameraCaptureSession session) {
                    if (cameraDevice == null) {
                        return;
                    }
                    cameraCaptureSession = session;
                    try {
                        //Set auto focus
                        previewRequestBuilder.set(CaptureRequest.CONTROL_AF_MODE,
                                CaptureRequest.CONTROL_AF_MODE_CONTINUOUS_PICTURE);
                        //Start preview (continuous request)
                        cameraCaptureSession.setRepeatingRequest(previewRequestBuilder.build(),
                                new CameraCaptureSession.CaptureCallback() {
                                    @Override
                                    public void onCaptureCompleted(@NonNull CameraCaptureSession session,
                                                                   @NonNull CaptureRequest request,
                                                                   @NonNull TotalCaptureResult result) {
                                        super.onCaptureCompleted(session, request, result);
                                    }
                                }, backgroundHandler);
                    } catch (CameraAccessException e) {
                        e.printStackTrace();
                    }
                }
                @Override
                public void onConfigureFailed(@NonNull CameraCaptureSession session) {
                    Toast.makeText(Camera2Activity.this, "Failed to configure preview session", Toast.LENGTH_SHORT).show();
                }
            }, backgroundHandler);
        } catch (CameraAccessException e) {
            e.printStackTrace();
        }
    }
    /**
     * Adjust the rotation and scale of the preview image (adapt to different screen orientations)
     */
    private void configureTransform(int viewWidth, int viewHeight) {
        if (previewSize == null || textureView == null) {
            return;
        }
        int rotation = getWindowManager().getDefaultDisplay().getRotation();
        Matrix matrix = new Matrix();
        RectF viewRect = new RectF(0, 0, viewWidth, viewHeight);
        RectF bufferRect = new RectF(0, 0, previewSize.getHeight(), previewSize.getWidth());
        float centerX = viewRect.centerX();
        float centerY = viewRect.centerY();
        if (Surface.ROTATION_90 == rotation || Surface.ROTATION_270 == rotation) {
            bufferRect.offset(centerX - bufferRect.centerX(), centerY - bufferRect.centerY());
            matrix.setRectToRect(viewRect, bufferRect, Matrix.ScaleToFit.FILL);
            float scale = Math.max(
                    (float) viewHeight / previewSize.getHeight(),
                    (float) viewWidth / previewSize.getWidth());
            matrix.postScale(scale, scale, centerX, centerY);
            matrix.postRotate(90 * (rotation - 2), centerX, centerY);
        } else if (Surface.ROTATION_180 == rotation) {
            matrix.postRotate(180, centerX, centerY);
        }
        textureView.setTransform(matrix);
    }
    /**
     * Execute photo taking logic
     */
    private void takePhoto() {
        if (cameraDevice == null || cameraCaptureSession == null) {
            Toast.makeText(this, "Camera not ready", Toast.LENGTH_SHORT).show();
            return;
        }
        try {
            //Build photo request
            CaptureRequest.Builder captureBuilder = cameraDevice.createCaptureRequest(CameraDevice.TEMPLATE_STILL_CAPTURE);
            captureBuilder.addTarget(imageReader.getSurface());
            //Set photo parameters (auto focus, auto exposure)
            captureBuilder.set(CaptureRequest.CONTROL_AF_MODE, CaptureRequest.CONTROL_AF_MODE_CONTINUOUS_PICTURE);
            captureBuilder.set(CaptureRequest.CONTROL_AE_MODE, CaptureRequest.CONTROL_AE_MODE_ON_AUTO_FLASH);
            //Adjust photo rotation angle
            int rotation = getWindowManager().getDefaultDisplay().getRotation();
            captureBuilder.set(CaptureRequest.JPEG_ORIENTATION, ORIENTATIONS.get(rotation));
            //Stop preview, take photo
            cameraCaptureSession.stopRepeating();
            cameraCaptureSession.capture(captureBuilder.build(), new CameraCaptureSession.CaptureCallback() {
                @Override
                public void onCaptureCompleted(@NonNull CameraCaptureSession session,
                                               @NonNull CaptureRequest request,
                                               @NonNull TotalCaptureResult result) {
                    super.onCaptureCompleted(session, request, result);
                    //Resume preview after photo is taken
                    try {
                        session.setRepeatingRequest(previewRequestBuilder.build(), null, backgroundHandler);
                        Toast.makeText(Camera2Activity.this, "Photo taken successfully", Toast.LENGTH_SHORT).show();
                    } catch (CameraAccessException e) {
                        e.printStackTrace();
                    }
                }
            }, backgroundHandler);
        } catch (CameraAccessException e) {
            e.printStackTrace();
            Toast.makeText(this, "Failed to take photo", Toast.LENGTH_SHORT).show();
        }
    }
    /**
     * Save photo to local
     */
    private void savePhoto(Image image) {
        ByteBuffer buffer = image.getPlanes()[0].getBuffer();
        byte[] bytes = new byte[buffer.remaining()];
        buffer.get(bytes);
        //Generate unique file name (timestamp)
        String fileName = System.currentTimeMillis() + ".jpg";
        File photoFile = new File(PHOTO_SAVE_PATH + fileName);
        try (FileOutputStream fos = new FileOutputStream(photoFile)) {
            fos.write(bytes);
            runOnUiThread(() -> Toast.makeText(this, "Photo saved: " + photoFile.getPath(), Toast.LENGTH_SHORT).show());
        } catch (IOException e) {
            e.printStackTrace();
            runOnUiThread(() -> Toast.makeText(this, "Failed to save photo", Toast.LENGTH_SHORT).show());
        }
    }
    /**
     * Permission application callback
     */
    @Override
    public void onRequestPermissionsResult(int requestCode, @NonNull String[] permissions, @NonNull int[] grantResults) {
        super.onRequestPermissionsResult(requestCode, permissions, grantResults);
        if (requestCode == 1001) {
            if (grantResults.length > 0 && grantResults[0] == PackageManager.PERMISSION_GRANTED
                    && grantResults[1] == PackageManager.PERMISSION_GRANTED) {
                //Permission application successful, open camera
                if (textureView.isAvailable()) {
                    openCamera(textureView.getWidth(), textureView.getHeight());
                }
            } else {
                Toast.makeText(this, "Camera and storage permissions are required", Toast.LENGTH_SHORT).show();
                finish();
            }
        }
    }
    /**
     * Release resources
     */
    private void closeCamera() {
        if (cameraCaptureSession != null) {
            cameraCaptureSession.close();
            cameraCaptureSession = null;
        }
        if (cameraDevice != null) {
            cameraDevice.close();
            cameraDevice = null;
        }
        if (imageReader != null) {
            imageReader.close();
            imageReader = null;
        }
    }
    /**
     * Stop background thread
     */
    private void stopBackgroundThread() {
        if (backgroundThread != null) {
            backgroundThread.quitSafely();
            try {
                backgroundThread.join();
                backgroundThread = null;
                backgroundHandler = null;
            } catch (InterruptedException e) {
                e.printStackTrace();
            }
        }
    }
    @Override
    protected void onDestroy() {
        super.onDestroy();
        closeCamera();
        stopBackgroundThread();
    }
}
Application Deployment and Startup
Application Deployment
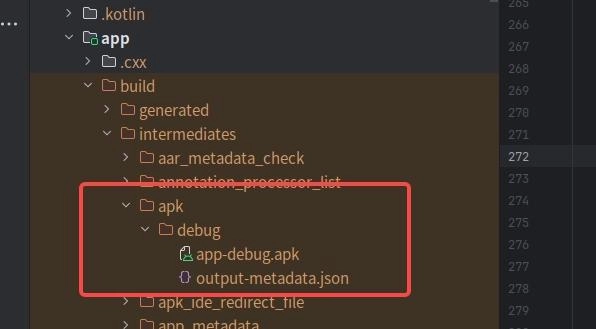
Click the green run button in the Android Studio toolbar, and the IDE will automatically execute the predefined build script to complete the compilation, packaging, and installation of the APK Debug version. Prerequisite: An emulator or real device needs to be connected currently, otherwise it will prompt “No available devices”. The generated APK file is located at
project file path/app/build/intermediates/apk/debug/app-debug.apk.
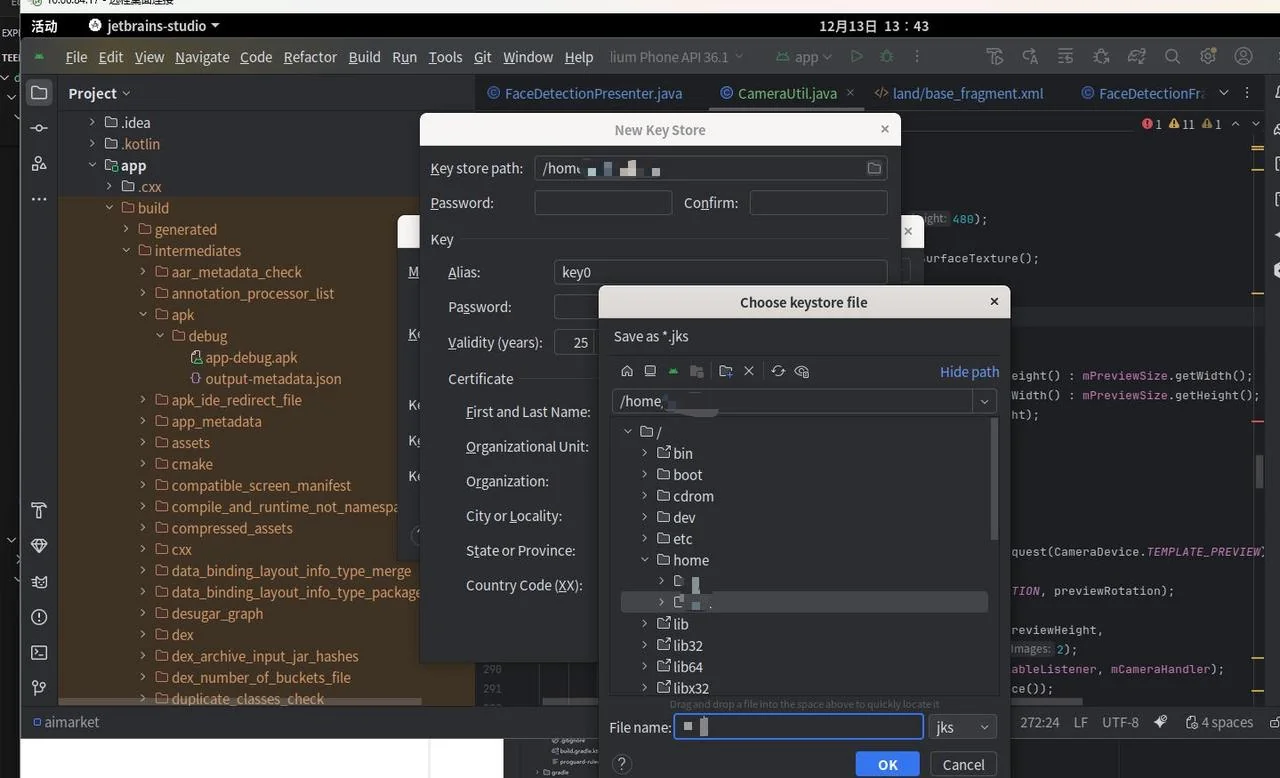
If no emulator is connected and you want to manually generate a debug version or a signed release version APK, you can select “Android App Bundle” or “APK” under the build - Generate Signed App Bundle or apk path in the top toolbar of Android Studio. After clicking Next, the system will prompt you to select a signature file. You can select an existing .jks or .keystore file, or create a new signature file. When creating a new one, you need to name the signature file (the default suffix is .jks) and select the storage path.
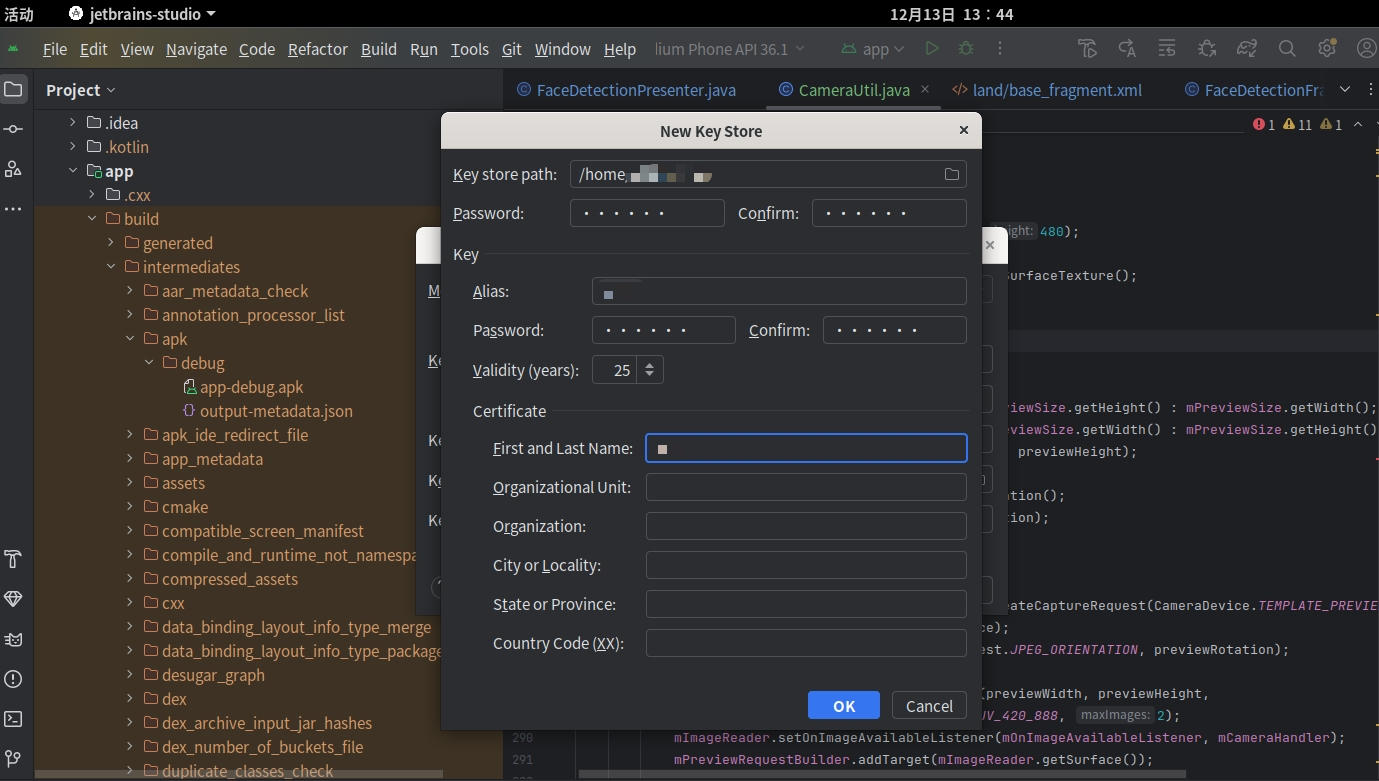
Then set your signature password and key alias (Alias, i.e. the custom identifier of the key, can be named by yourself), and click “OK” after completion, the system will automatically create the signature file.
After completing the signature configuration, select the release or debug package, and the system will use the currently configured signature file for packaging. The generated signed APK file is located in the
project file path/app/releasedirectory by default.
Application Startup
Emulator Startup
When starting the project for the first time, Android Studio usually creates an emulator by default, just click the run button to start the project. If you need to use an emulator with a specified version or resolution, you need to create it manually.
Find “Device Manager” in the toolbar of Android Studio, click “Create Virtual Device”, select the required emulator configuration, and click “Next”.
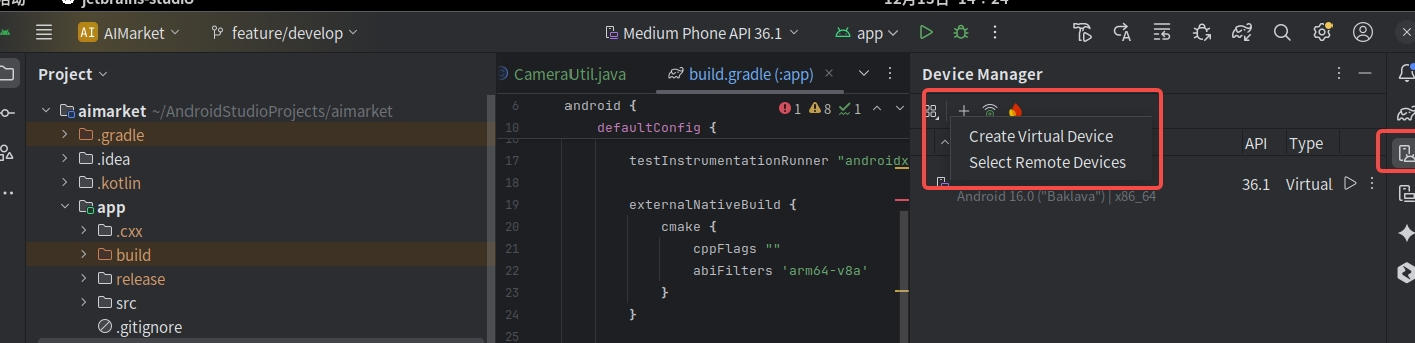
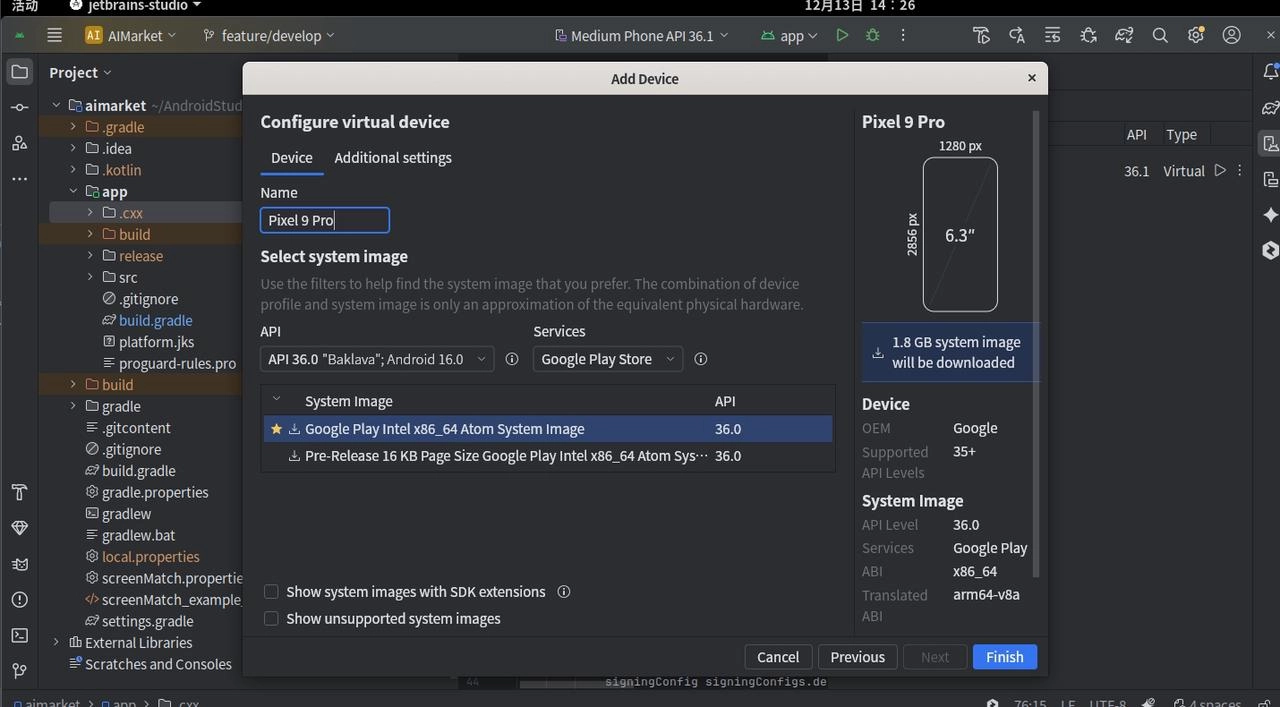
Real Device Startup
First, use a USB cable to connect the computer and the phone. Enter the phone’s “Settings” - “About Phone”, click “Version Number” 7 times in a row, until the prompt “You are now in developer mode” appears. Return to the settings menu, enter “Developer Options”, and enable “USB Debugging” (the path may vary slightly for different phone models, but the general operation is the same). At this time, an authorization box may pop up, click “Allow”.
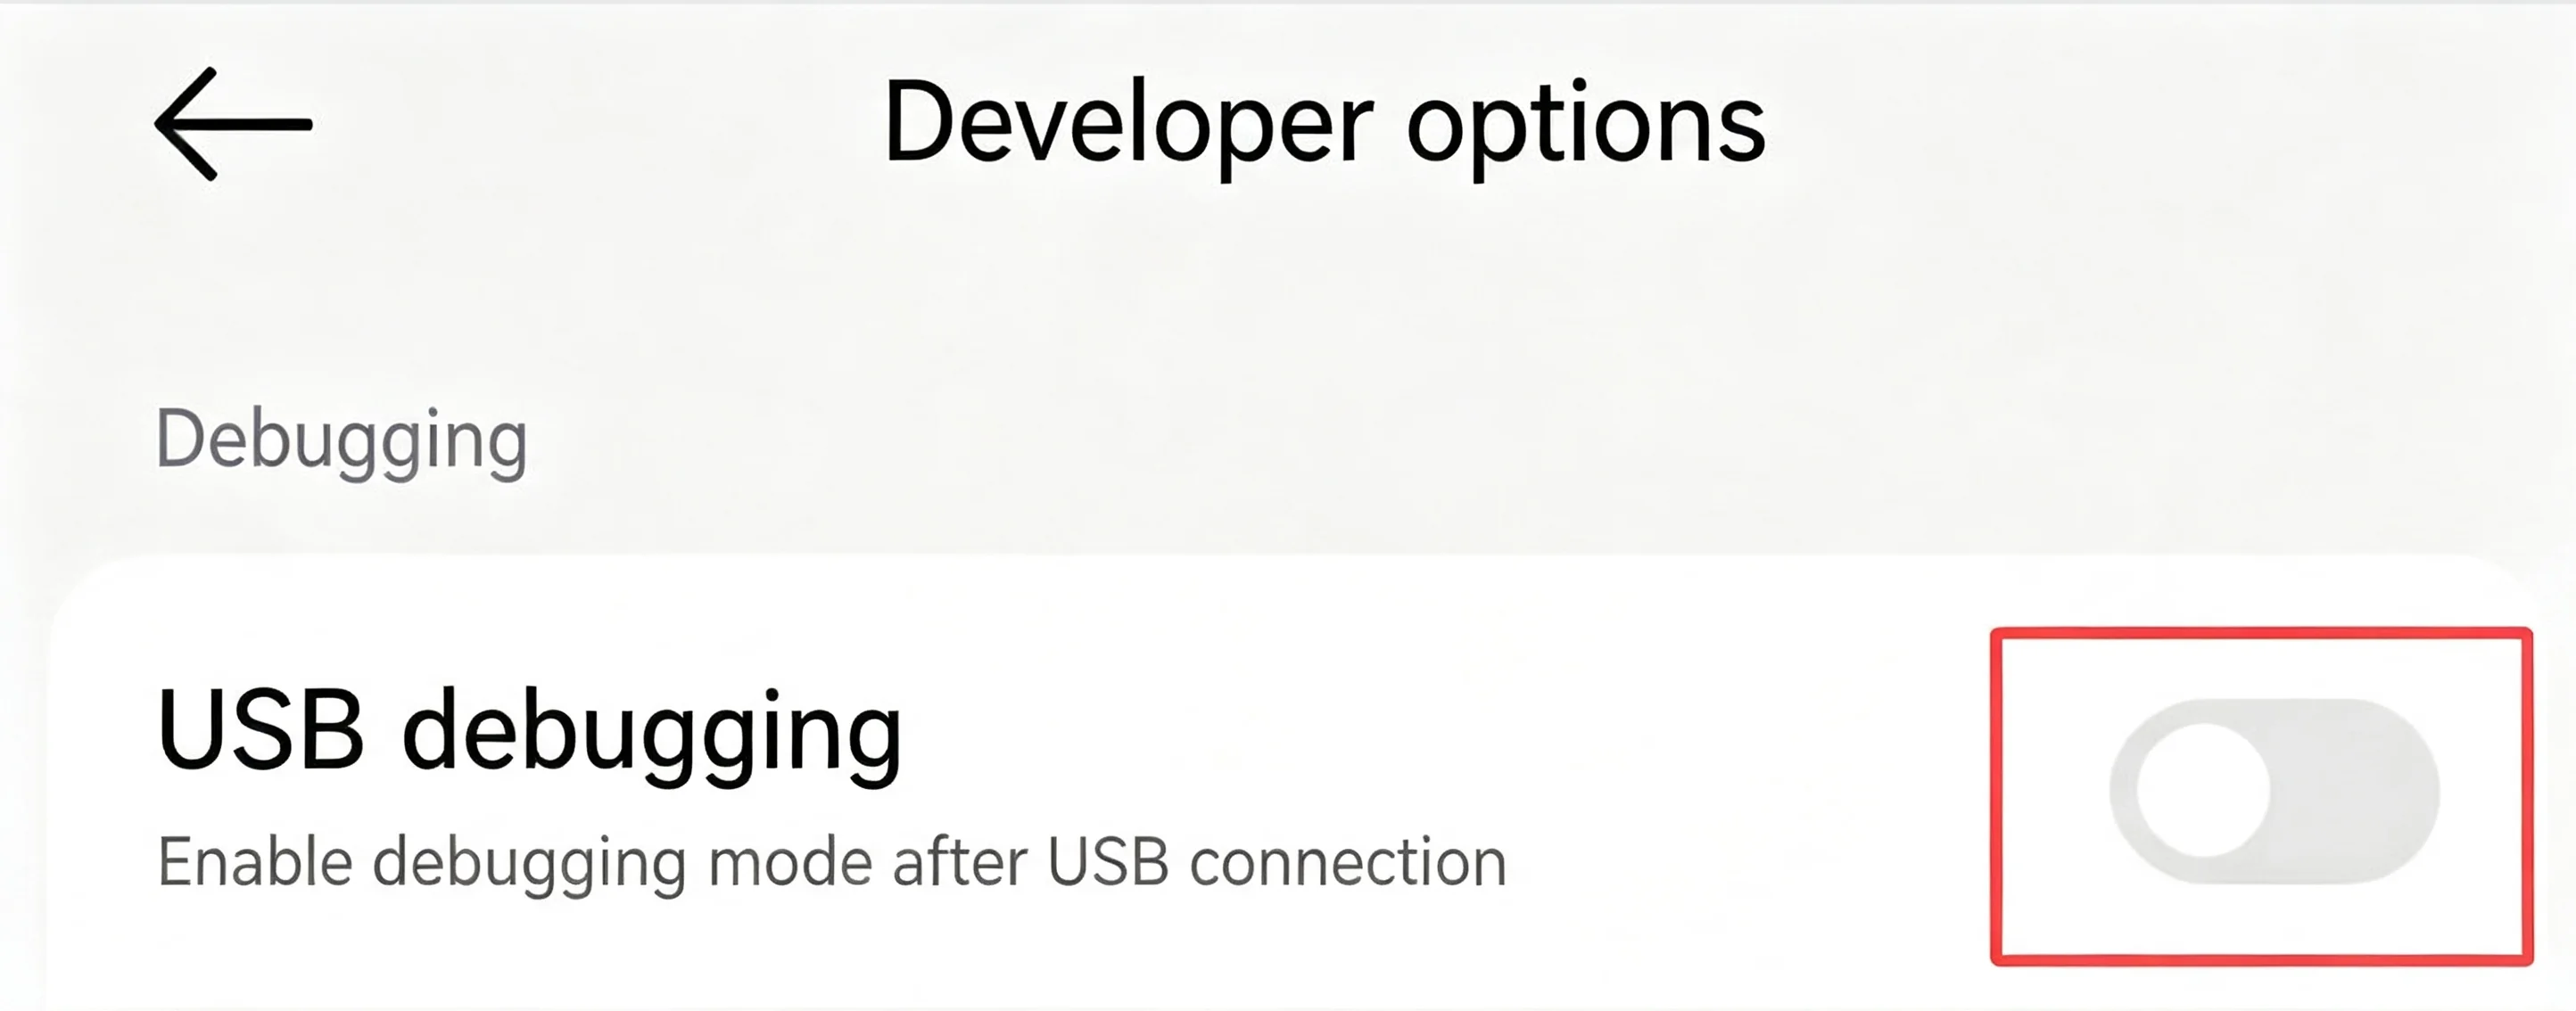
At this time, enter the command
adb devicesin the terminal. If the information of the currently connected device appears, the connection is successful.
Wireless connection can get rid of cable constraints, but usually requires USB to complete the initial setup first. The specific operation varies depending on the Android version of the phone.
Please make sure the phone and computer are in the same local area network, and enable developer mode, USB debugging, and wireless debugging on the phone;
Check the current IP address of the phone, enter the command
adb connect <IP address>in the terminal. If the information of the currently connected device appears, the connection is successful.
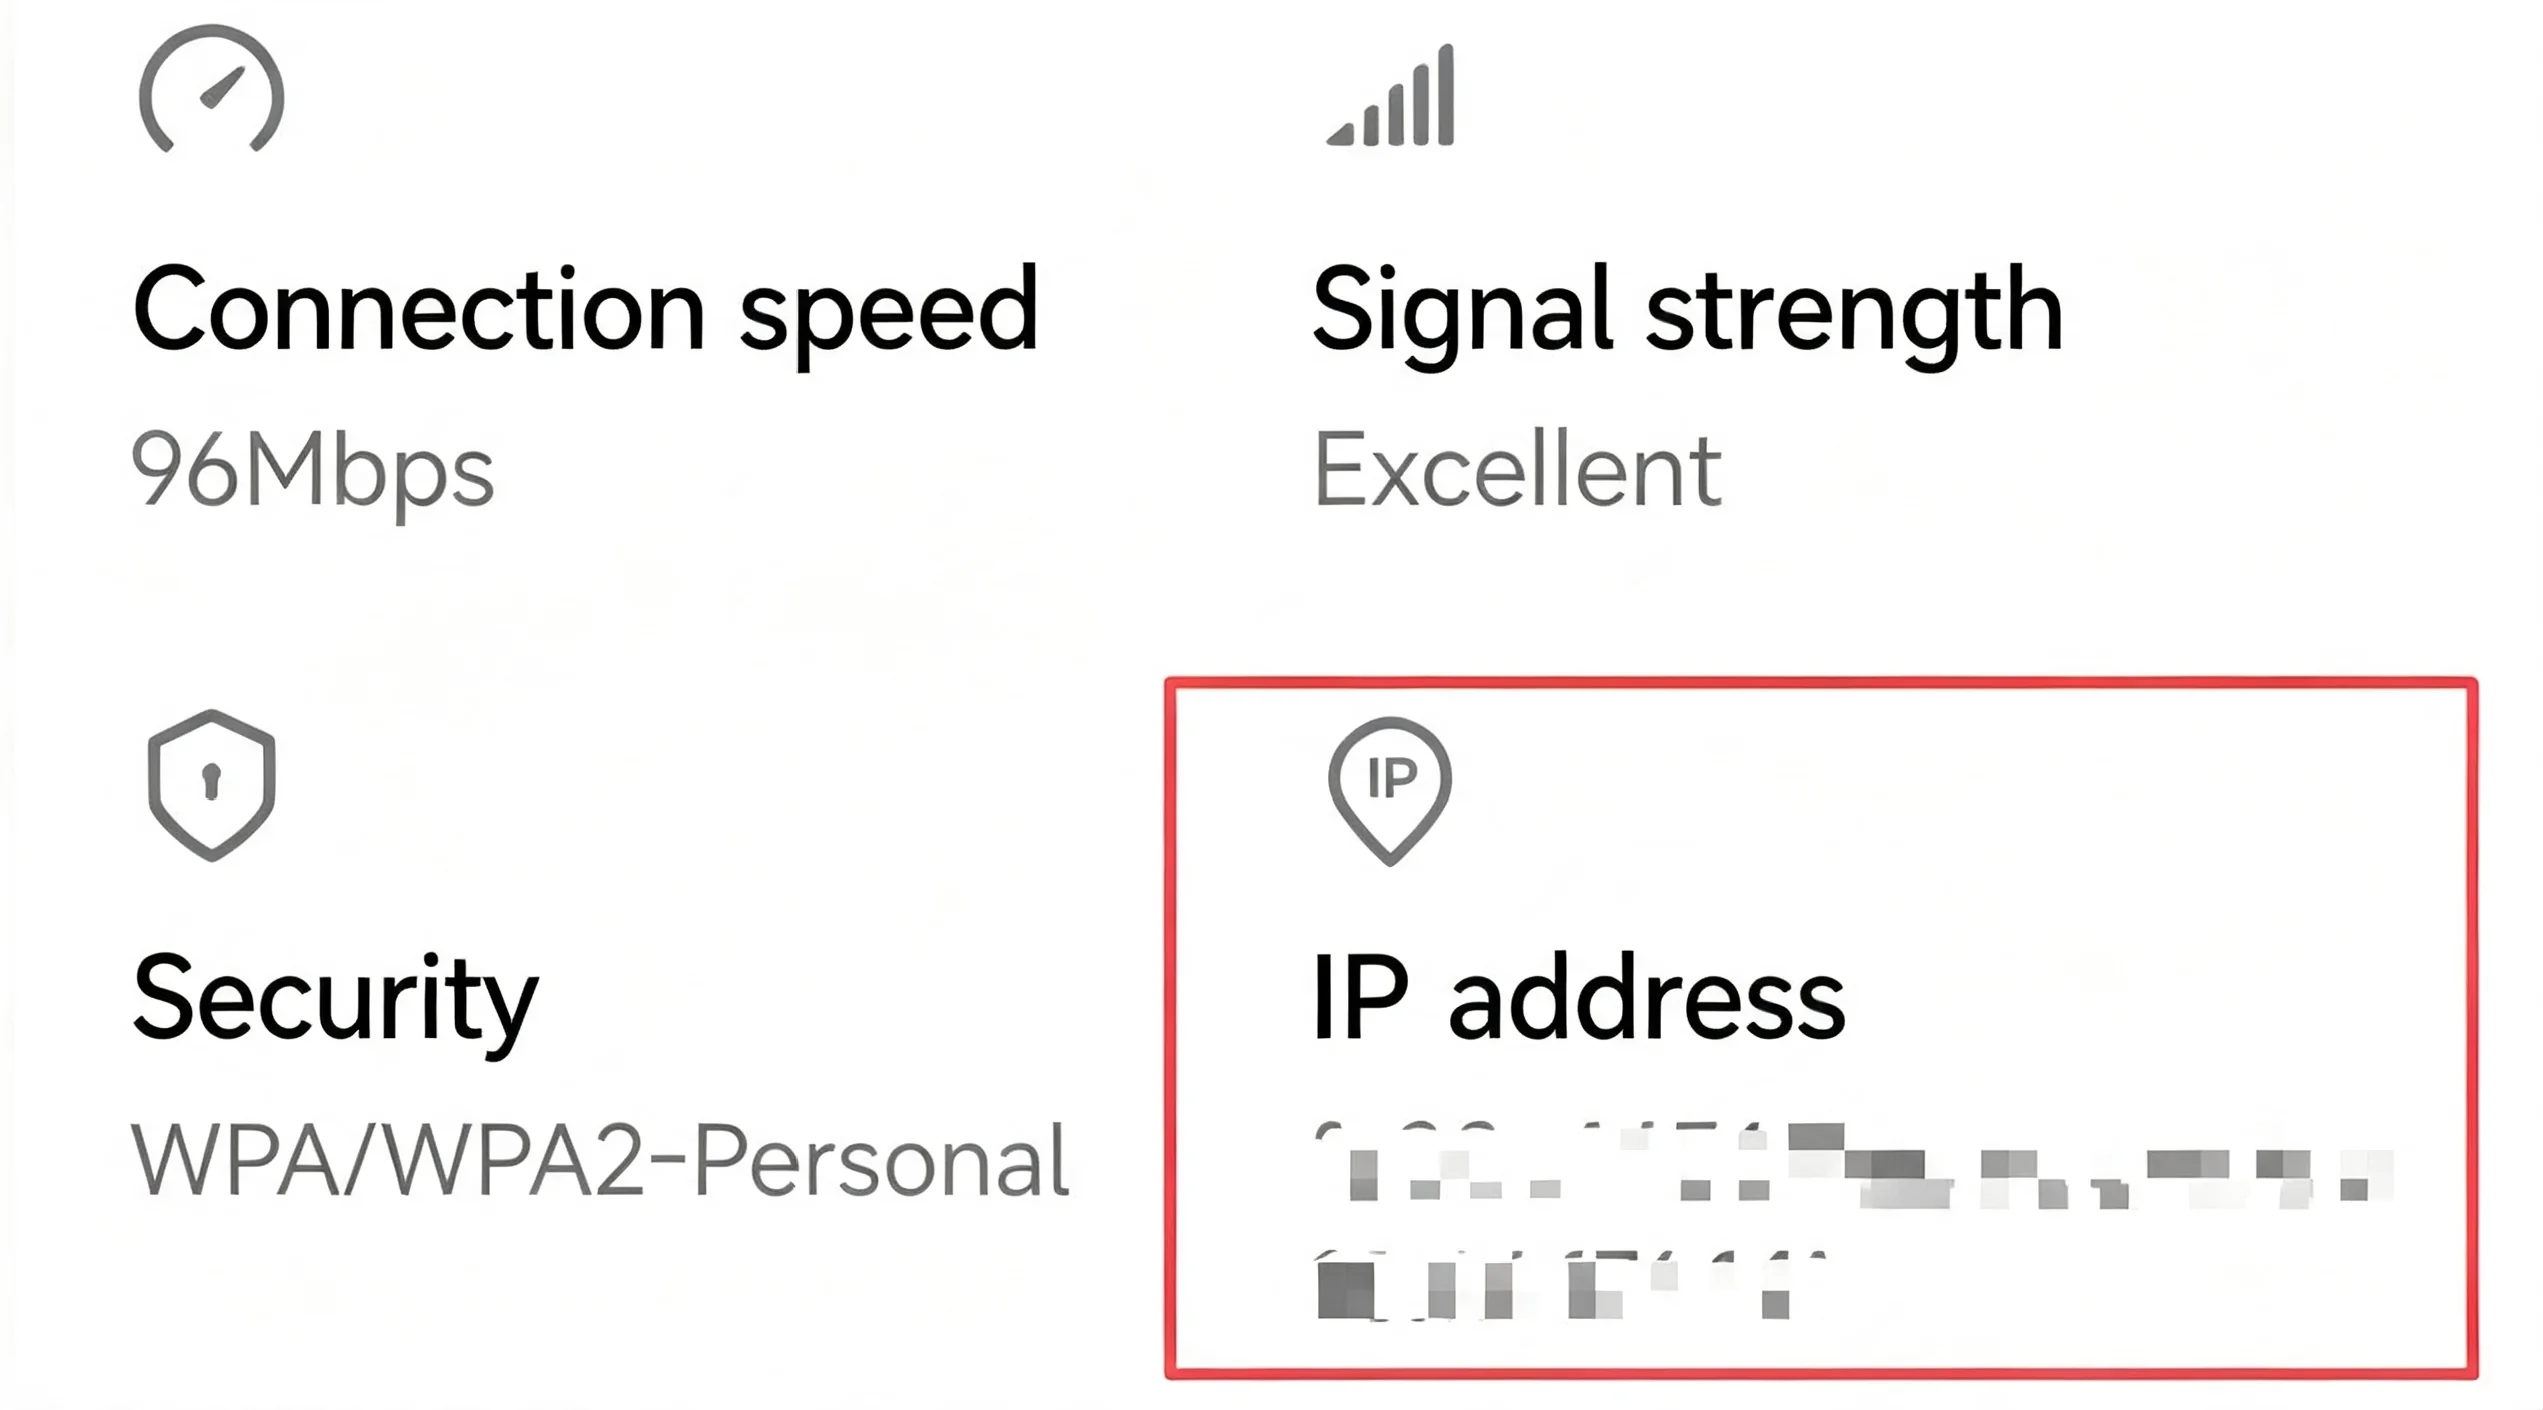
ADB Debugging
Tool Configuration
The ADB tool is integrated in the
platform-toolsdirectory of the Android SDK, and this directory needs to be configured in the system environment variables:Windows: Add
SDK path\platform-toolsto the systemPathvariable;Linux/macOS: Execute
echo 'export PATH=$PATH:SDK path/platform-tools' >> ~/.bashrc, and restart the terminal to take effect.Verify configuration: Execute
adb versionin the terminal. If the version information can be displayed normally, the configuration is successful.
ADB Connection for Embedded Devices
On the hardware device side: Enter the system settings, click “Version Number” 7 times in a row to enable the developer options, and after entering the developer options, enable “USB Debugging” and “USB Installation” permissions.
On the computer side: Connect the device to the computer via a USB cable, and execute
adb devicesin the terminal. If the device serial number is displayed in the list, the connection is successful. If the device serial number is not recognized, executeadb kill-server && adb start-serverto restart the ADB service.
Common ADB Debugging Commands
Function Scenario |
Command Example |
Description |
|---|---|---|
View device logs |
adb logcat |
Output device runtime logs in real‑time. Filter keywords with grep (e.g. |
Install application |
adb install <local‑APK‑path> |
Install locally‑compiled APK onto the device. Add |
Enter device Shell |
adb shell |
Access the device command‑line interface. Run low‑level hardware query commands (e.g. |
Transfer files |
adb push <local‑path> <device‑path> |
Push files to the device. Use |
Reboot device |
adb reboot |
Reboot embedded device when debugging anomalies occur. |