First hardware project
This chapter uses the IMX219 camera, an accessory supported by the Quectel Pi development kit, as an example to help you quickly get familiar with peripheral debugging on Quectel Pi.
Take Your First Photo with the IMX219 Camera
If you do not have an IMX219 camera module, you may skip this chapter. For a more detailed camera tutorial, see: Camera
Installing the Camera
Power off the development board.
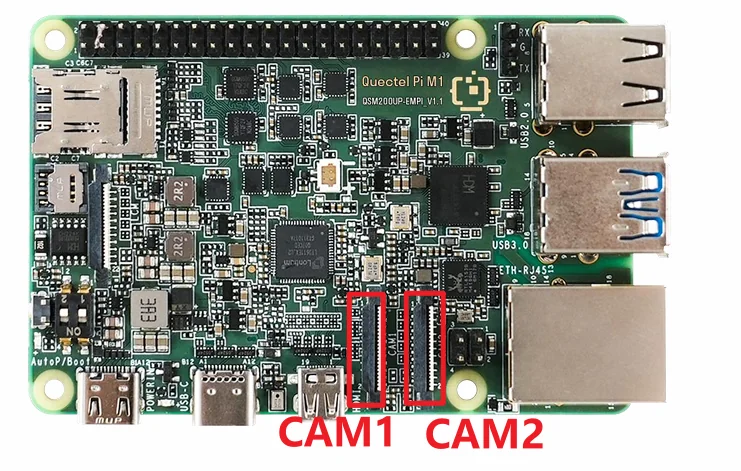
Locate the MIPI CSI ribbon cable connector labeled CAM1 or CAM2 on the board.
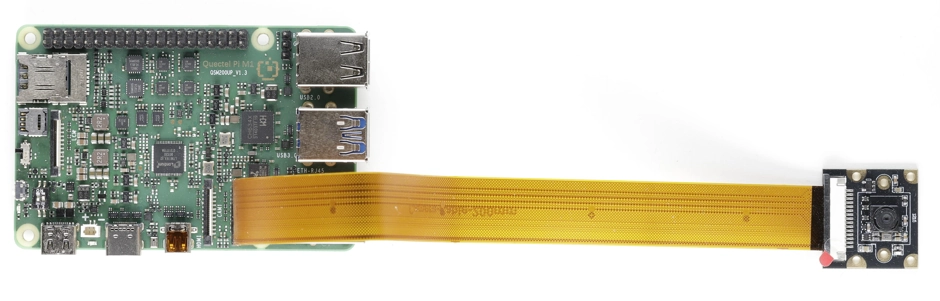
Insert the IMX219 camera ribbon cable with the gold contacts facing down into the connector, then secure the latch.
Power the board back on.
Note: The ribbon cable must not be inserted in the wrong direction — the gold contact side must face toward the circuit board (facing down). Always power off the board before installing or removing the ribbon cable.
Introduction to GStreamer Pipeline Commands
This chapter uses the gst-launch-1.0 command to control camera capture, recording, and preview. You only need to copy the commands provided in the following sections to perform the operations — no in-depth understanding of the underlying principles is required.
Here is a brief introduction to the command structure to help you understand what each command does:
gst-launch-1.0 is a command-line tool from the GStreamer multimedia framework. It uses the ! symbol to chain multiple processing steps into a pipeline, where data flows from left to right. For example:
gst-launch-1.0 camera_capture ! encode ! save_to_file
All commands in this chapter follow this pattern:
Photo capture: Capture frames from the camera → Encode as JPEG image → Save to file
Video recording: Capture frames from the camera → Encode as H.264 video → Mux into MP4 → Save to file
View image / Play video: Read file → Decode → Display on screen
Choose Your Desktop Environment
The Debian system on Quectel Pi supports two desktop environments: Gnome and Weston. The camera environment variable configuration differs slightly between them. Please first read the Operating System chapter to determine which desktop environment you are currently using, then follow the corresponding section below:
Using Gnome desktop → See Control Camera (Gnome)
Using Weston desktop → See Control Camera (Weston)
Control Camera (Gnome)
The camera can capture photos/record video to files for viewing, or preview directly on the display desktop:
Set Desktop Environment Variables
The default desktop for the M1 Debian system is Gnome. Copy the following command-line code and execute it in the adb terminal:
# Not required if you do not need desktop preview
# Gnome desktop
export XDG_RUNTIME_DIR=/run/user/1007
export WAYLAND_DISPLAY=wayland-0
#Weston
export XDG_RUNTIME_DIR=/run/user/root
export WAYLAND_DISPLAY=wayland-1
Capture a Photo
Use camera=0/1 to distinguish the camera connected to each CSI slot. camera=0 refers to the first CSI slot, and camera=1 refers to the second CSI slot.
Run the following command in the device terminal:
timeout 2 gst-launch-1.0 -e qtiqmmfsrc camera=1 \
  ! video/x-raw,format=NV12,width=1920,height=1080 \
  ! jpegenc ! multifilesink location=/tmp/photo_%d.jpg max-files=1
This command starts the camera at 1080p 30 FPS, captures a photo after a 2-second delay, encodes it as JPEG, and saves it as an image file. If the gst pipeline state changes to “PLAYING”, the camera is running.
The image file is saved in the /tmp/ directory.
You can enter the following command to view the image file:
gst-launch-1.0 filesrc location=photo_%d.jpg ! jpegdec ! imagefreeze ! waylandsink
Record a Video
Run the following command in the device terminal:
gst-launch-1.0 -e qtiqmmfsrc camera=0 \
  ! video/x-raw,format=NV12,width=1280,height=720,framerate=30/1 \
  ! qtic2venc ! h264parse ! mp4mux ! filesink location=/tmp/video.mp4
This command starts the camera at 720p 30 FPS, encodes the video as H.264, and saves it as a video file. If the gst pipeline state changes to “PLAYING”, the camera is running.
The MP4 file is saved in the /tmp/ directory.
To stop camera recording, press CTRL+C.
You can enter the following command to play the video file:
Control Camera (Weston)
Set Desktop Environment Variables
Before using camera features, enter the following commands in the terminal. Copy the command-line code below and execute it in the adb terminal:
bash

a=find /run/user -maxdepth 2 -name 'wayland-?' 2>/dev/null;
export XDG_RUNTIME_DIR=dirname $a
export WAYLAND_DISPLAY=basename $a
export LD_PRELOAD=/opt/qcom/lib/libgbm.so:$LD_PRELOAD
Capture a Photo
Use camera=0/1 to distinguish the camera connected to each CSI slot. camera=0 refers to the first CSI slot, and camera=1 refers to the second CSI slot.
Run the following command in the device terminal:
timeout 2 gst-launch-1.0 -e qtiqmmfsrc camera=0 \
  ! video/x-raw,format=NV12,width=1920,height=1080 \
  ! jpegenc ! multifilesink location=/tmp/photo_%d.jpg max-files=1
This command starts the camera at 1080p 30 FPS, captures a photo after a 2-second delay, encodes it as JPEG, and saves it as an image file. If the gst pipeline state changes to “PLAYING”, the camera is running.
The image file is saved in the /tmp/ directory.
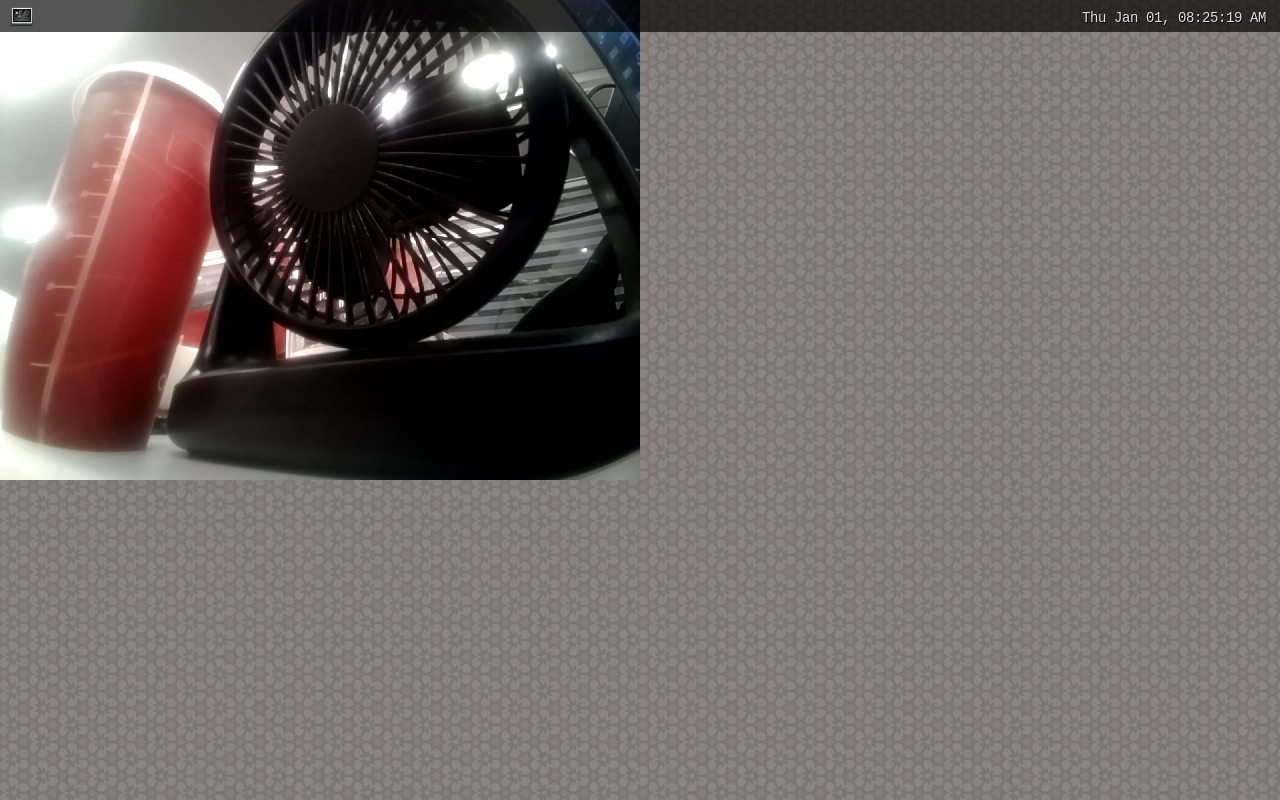
You can enter the following command to view the generated image file. For example, if the generated image is named photo_20.jpg:
gst-launch-1.0 filesrc location=/tmp/photo_20.jpg ! jpegdec ! imagefreeze ! waylandsink
Record a Video
Run the following command in the device terminal:
gst-launch-1.0 -e qtiqmmfsrc camera=0 \
  ! video/x-raw,format=NV12,width=1280,height=720,framerate=30/1 \
  ! qtic2venc ! h264parse ! mp4mux ! filesink location=/tmp/video.mp4
This command starts the camera at 720p 30 FPS, encodes the video as H.264, and saves it as a video file. If the gst pipeline state changes to “PLAYING”, the camera is running.
The MP4 file is saved in the /tmp/ directory.
To stop camera recording, press CTRL+C.
You can enter the following command to play the video file:
gst-launch-1.0 filesrc location=/tmp/video.mp4 ! qtdemux name=demux demux.video_0 ! h264parse ! avdec_h264 ! videoconvert !