YOLO 模拟推理 分割模型
Copyright © Quectel Wireless Solutions Co., Ltd. 2026. All rights reserved.
什么是"模拟推理"与"分割模型"
模拟推理
模拟推理(Simulated Inference) 指不依赖 NPU/VPU 等专用硬件加速器,直接在 CPU 上用通用推理框架(如 ONNX Runtime)完成神经网络的前向计算。
优点:通用性强、无需特定硬件 SDK、部署简单,适合功能验证与算法调试。
缺点:算力利用率不如 NPU,速度较慢(本 Demo 单张约 0.5s)。
适用场景:在真实硬件加速(NPU/VPU)方案确定之前,先验证算法与效果。
本 Demo 即采用 CPU 模拟推理:设备端用 ONNX Runtime + OpenCV 直接推理,无需 NPU/CDSP 相关 SDK。
分割模型(实例分割)
目标检测只有"框"(bounding box),而 分割模型 更进一步,输出每个目标的 像素级掩膜(mask),把目标轮廓精确"抠"出来。
任务 |
输出 |
精度 |
|---|---|---|
目标检测(YOLOv8) |
类别 + 矩形框 |
边界是矩形框 |
实例分割(YOLOv8-seg) |
类别 + 矩形框 + 像素掩膜 |
边界贴合目标轮廓 |
yolo11n-seg.onnx 是 YOLO11 的 nano 分割模型,COCO 80 类,约 11.7 MB。
分割模型原理简述
YOLO 分割模型(YOLOv8-seg / YOLO11-seg)有 两个输出头:
输出1(检测头): [1, 116, 8400]
                  ├─ 前 4   行:框中心 (cx,cy) 与宽高 (w,h)
                  ├─ 中间 80 行:80 个类别的置信度
                  └─ 后 32  行:每个候选的掩膜系数(mask coefficients)
输出2(原型掩膜):[1, 32, 160, 160]
                  32 张 160×160 的原型掩膜(prototype masks)
掩膜重建公式:
mask = Sigmoid( 掩膜系数(32) × 原型掩膜(32×160×160) ) → 160×160
即用每个目标的 32 个掩膜系数对 32 张原型掩膜做线性组合,再经 Sigmoid 激活与阈值化,得到该目标的二值掩膜,最后缩放到检测框尺寸。
部署与文件
目录结构(设备端)
/opt/yolo/
├yolo11n-seg.onnx      # 分割模型(yolo11n-seg,约 11.7 MB)
├── yolo_seg.py            # 分割 Demo 脚本
├── ort/                   # 兼容版 onnxruntime(CPU 模拟推理用)
└── test.jpg               # 测试图片
模型下载
在可联网宿主机下载后推送:
curl -sL -o yolo11n-seg.onnx \
  https://github.com/ultralytics/assets/releases/download/v8.3.0/yolo11n-seg.onnx
adb push yolo11n-seg.onnx /opt/yolo/
脚本推送
脚本代码:
#!/usr/bin/env python3
import argparse
import os
import sys
import time

# 优先使用设备上兼容的 onnxruntime(针对无 SVE/dotprod 的 ARMv8 编译)
_ORT_DIR = "/opt/yolo/ort"
if _ORT_DIR not in sys.path and os.path.isdir(_ORT_DIR):
    sys.path.insert(0, _ORT_DIR)

import cv2
import numpy as np
import onnxruntime as ort

COCO_CLASSES = [
    "person", "bicycle", "car", "motorcycle", "airplane", "bus", "train", "truck", "boat",
    "traffic light", "fire hydrant", "stop sign", "parking meter", "bench", "bird", "cat",
    "dog", "horse", "sheep", "cow", "elephant", "bear", "zebra", "giraffe", "backpack",
    "umbrella", "handbag", "tie", "suitcase", "frisbee", "skis", "snowboard", "sports ball",
    "kite", "baseball bat", "baseball glove", "skateboard", "surfboard", "tennis racket",
    "bottle", "wine glass", "cup", "fork", "knife", "spoon", "bowl", "banana", "apple",
    "sandwich", "orange", "broccoli", "carrot", "hot dog", "pizza", "donut", "cake",
    "chair", "couch", "potted plant", "bed", "dining table", "toilet", "tv",
    "laptop", "mouse", "remote", "keyboard", "cell phone", "microwave", "oven", "toaster",
    "sink", "refrigerator", "book", "clock", "vase", "scissors", "teddy bear", "hair drier",
    "toothbrush",
]

INPUT_SIZE = 640     # 输入尺寸
NUM_CLS = 80         # 类别数
NUM_MASK = 32        # 掩膜系数个数
CONF_THRESH = 0.25
IOU_THRESH = 0.45
MASK_THRESH = 0.5    # 掩膜二值化阈值


def letterbox(img, size=640):
    h, w = img.shape[:2]
    r = min(size / h, size / w)
    new_w, new_h = int(round(w * r)), int(round(h * r))
    resized = cv2.resize(img, (new_w, new_h), interpolation=cv2.INTER_LINEAR)
    pad_x = (size - new_w) // 2
    pad_y = (size - new_h) // 2
    canvas = np.full((size, size, 3), 114, dtype=np.uint8)
    canvas[pad_y:pad_y + new_h, pad_x:pad_x + new_w] = resized
    return canvas, r, pad_x, pad_y


def preprocess(img):
    x, r, px, py = letterbox(img, INPUT_SIZE)
    x = cv2.cvtColor(x, cv2.COLOR_BGR2RGB).astype(np.float32) / 255.0
    x = x.transpose(2, 0, 1)[None, ...]
    return np.ascontiguousarray(x), r, px, py


def nms(dets, iou_thresh):
    order = dets[:, 4].argsort()[::-1]
    x1, y1, x2, y2 = dets[:, 0], dets[:, 1], dets[:, 2], dets[:, 3]
    areas = (x2 - x1) * (y2 - y1)
    picks = []
    while order.size > 0:
        i = order[0]
        picks.append(i)
        xx1 = np.maximum(x1[i], x1[order[1:]])
        yy1 = np.maximum(y1[i], y1[order[1:]])
        xx2 = np.minimum(x2[i], x2[order[1:]])
        yy2 = np.minimum(y2[i], y2[order[1:]])
        w = np.maximum(0.0, xx2 - xx1)
        h = np.maximum(0.0, yy2 - yy1)
        inter = w * h
        iou = inter / (areas[i] + areas[order[1:]] - inter + 1e-9)
        order = order[1:][iou <= iou_thresh]
    return picks


def decode_detections(output0, output1, r, px, py, orig_shape, conf_thresh, iou_thresh):
    """解码检测框 + 掩膜。返回 [(cls, conf, box, mask_uint8(H,W))](原图尺寸)。"""
    preds = output0[0]                # 1x116x8400
    proto = output1[0]                # 1x32x160x160
    boxes = preds[:4]                 # cx, cy, w, h(归一化到 640 输入)
    cls_scores = preds[4:4 + NUM_CLS]
    mask_coeffs = preds[4 + NUM_CLS:] # 32x8400

    cls_ids = cls_scores.argmax(0)
    confs = cls_scores.max(0)
    keep = confs >= conf_thresh
    if keep.sum() == 0:
        return []

    rs = 1.0 / r
    cx = (boxes[0] - px) * rs
    cy = (boxes[1] - py) * rs
    w = boxes[2] * rs
    h = boxes[3] * rs
    x1 = cx - w / 2
    y1 = cy - h / 2
    x2 = cx + w / 2
    y2 = cy + h / 2

    x1, y1, x2, y2, cls_ids, confs = (
        x1[keep], y1[keep], x2[keep], y2[keep], cls_ids[keep], confs[keep])
    mc = mask_coeffs[:, keep]         # 32 x N

    dets = np.stack([x1, y1, x2, y2, confs], axis=1)
    picks = nms(dets, iou_thresh)

    H, W = orig_shape[:2]
    results = []
    for i in picks:
        bx1, by1, bx2, by2 = dets[i][:4]
        bx1 = max(0, min(W, bx1)); by1 = max(0, min(H, by1))
        bx2 = max(0, min(W, bx2)); by2 = max(0, min(H, by2))
        cid = int(cls_ids[i])
        conf = float(confs[i])

        # 掩膜重建:mask = sigmoid(mask_coeff @ proto)
        m = mc[:, i] @ proto.reshape(NUM_MASK, -1)   # (160*160,)
        m = 1.0 / (1.0 + np.exp(-m))
        m = m.reshape(160, 160)
        # 裁剪到检测框(在 640 坐标系下)
        m = m[int((by1 + py) * 160 / 640):int((by2 + py) * 160 / 640),
              int((bx1 + px) * 160 / 640):int((bx2 + px) * 160 / 640)]
        if m.size == 0:
            continue
        # 缩放到原图框尺寸(取整后的实际像素宽高)
        bw = int(round(bx2 - bx1))
        bh = int(round(by2 - by1))
        m = cv2.resize(m, (bw, bh)) if m.size > 0 else np.zeros((bh, bw), np.float32)
        mask = (m >= MASK_THRESH).astype(np.uint8) * 255
        results.append((cid, conf, (int(bx1), int(by1), int(bx2), int(by2)), mask))
    return results


def draw(img, results):
    """在原图上画框 + 半透明彩色掩膜 + 标签。"""
    overlay = img.copy()
    for idx, (cid, conf, box, mask) in enumerate(results):
        x1, y1, x2, y2 = box
        color = (int((idx * 60) % 256), int((idx * 120 + 60) % 256), int((idx * 180 + 90) % 256))
        # 按 ROI 实际尺寸重采样掩膜,避免与切片维度不一致
        roi = overlay[y1:y2, x1:x2]
        if roi.size == 0:
            continue
        m = cv2.resize(mask, (roi.shape[1], roi.shape[0]))
        roi[m > 0] = color
        label = f"{COCO_CLASSES[cid]} {conf:.2f}"
        cv2.rectangle(img, (x1, y1), (x2, y2), color, 2)
        (tw, th), _ = cv2.getTextSize(label, cv2.FONT_HERSHEY_SIMPLEX, 0.6, 2)
        y_txt = y1 - 4 if y1 - th > 4 else y1 + th + 4
        cv2.rectangle(img, (x1, y1 - th - 8), (x1 + tw + 6, y1), color, -1)
        cv2.putText(img, label, (x1 + 3, y_txt), cv2.FONT_HERSHEY_SIMPLEX, 0.6, (0, 0, 0), 2)
    return cv2.addWeighted(img, 0.6, overlay, 0.4, 0)


class YOLOSeg:
    def __init__(self, model_path="/opt/yolo/yolo11n-seg.onnx"):
        self.sess = ort.InferenceSession(
            model_path, providers=["CPUExecutionProvider"],
            sess_options=ort.SessionOptions())
        self.input_name = self.sess.get_inputs()[0].name
        print(f"[INFO] 分割模型加载成功: {model_path}")

    def detect(self, img, conf_thresh=CONF_THRESH, iou_thresh=IOU_THRESH):
        x, r, px, py = preprocess(img)
        # 分割模型有两个输出:检测头 + 原型掩膜
        outs = self.sess.run(None, {self.input_name: x})
        return decode_detections(outs[0], outs[1], r, px, py, img.shape,
                                 conf_thresh, iou_thresh)


def main():
    ap = argparse.ArgumentParser(description="YOLO 分割模型 Demo (CPU 模拟推理)")
    ap.add_argument("--image", type=str, required=True, help="输入图片路径")
    ap.add_argument("--out", type=str, default=None, help="输出图片路径")
    ap.add_argument("--no-show", action="store_true", help="不显示窗口")
    ap.add_argument("--model", type=str, default="/opt/yolo/yolo11n-seg.onnx")
    ap.add_argument("--conf", type=float, default=CONF_THRESH)
    args = ap.parse_args()

    seg = YOLOSeg(args.model)

    img = cv2.imread(args.image)
    if img is None:
        print(f"[ERR] 无法读取图片: {args.image}")
        sys.exit(1)

    t0 = time.time()
    results = seg.detect(img, args.conf)
    dt = (time.time() - t0) * 1000
    print(f"[INFO] 分割到 {len(results)} 个实例, 推理耗时 {dt:.1f} ms")
    for cid, conf, box, _ in results:
        print(f"  - {COCO_CLASSES[cid]} conf={conf:.2f} box={box}")

    draw(img, results)
    out = args.out or os.path.splitext(args.image)[0] + "_seg.jpg"
    cv2.imwrite(out, img)
    print(f"[INFO] 结果已保存: {out}")
    if not args.no_show:
        cv2.imshow("YOLO Seg", img)
        cv2.waitKey(0)
        cv2.destroyAllWindows()


if __name__ == "__main__":
    main()
adb push yolo_seg.py /opt/yolo/
依赖环境(OpenCV、numpy、兼容版 onnxruntime)与检测 Demo 相同,见 YOLO 板端部署 目标检测
使用教程
单张图片分割
adb shell
cd /opt/yolo
python3 yolo_seg.py --image test.jpg --out seg_out.jpg
# 无显示器加 --no-show
参数说明:
参数 |
含义 |
|---|---|
--image <路径> |
输入图片路径(必填) |
--out <路径> |
输出图片路径,默认 xxx_seg.jpg |
--no-show |
无显示器时不弹窗 |
--model <路径> |
模型路径,默认 /opt/yolo/yolo11n-seg.onnx |
--conf <阈值> |
置信度阈值,默认 0.25 |
实测输出示例(识别出键盘并生成像素掩膜):
[INFO] 分割模型加载成功: /opt/yolo/yolo11n-seg.onnx
[INFO] 分割到 1 个实例, 推理耗时 480.9 ms
  - keyboard conf=0.94 box=(1, 273, 1280, 1026)
[INFO] 结果已保存: seg_out.jpg
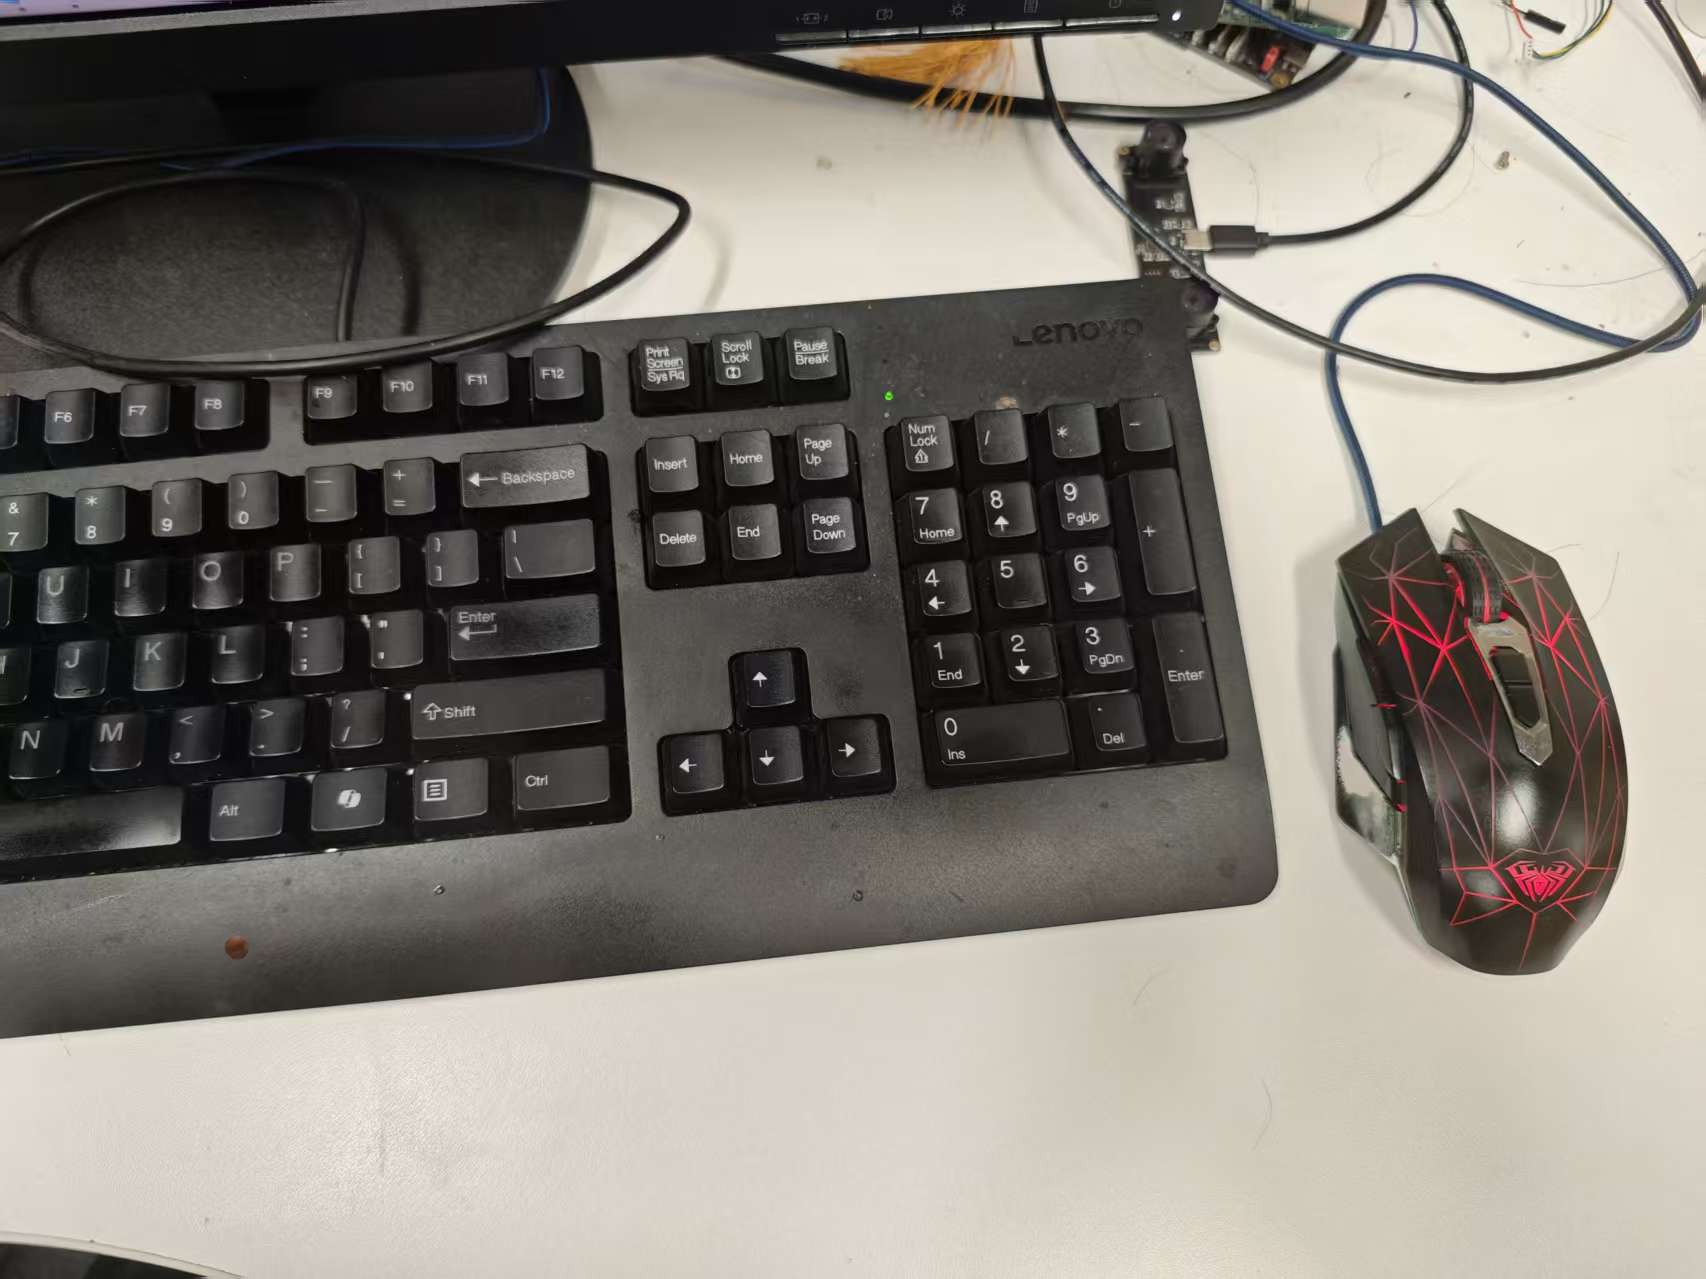
待测图片:
返回图片:
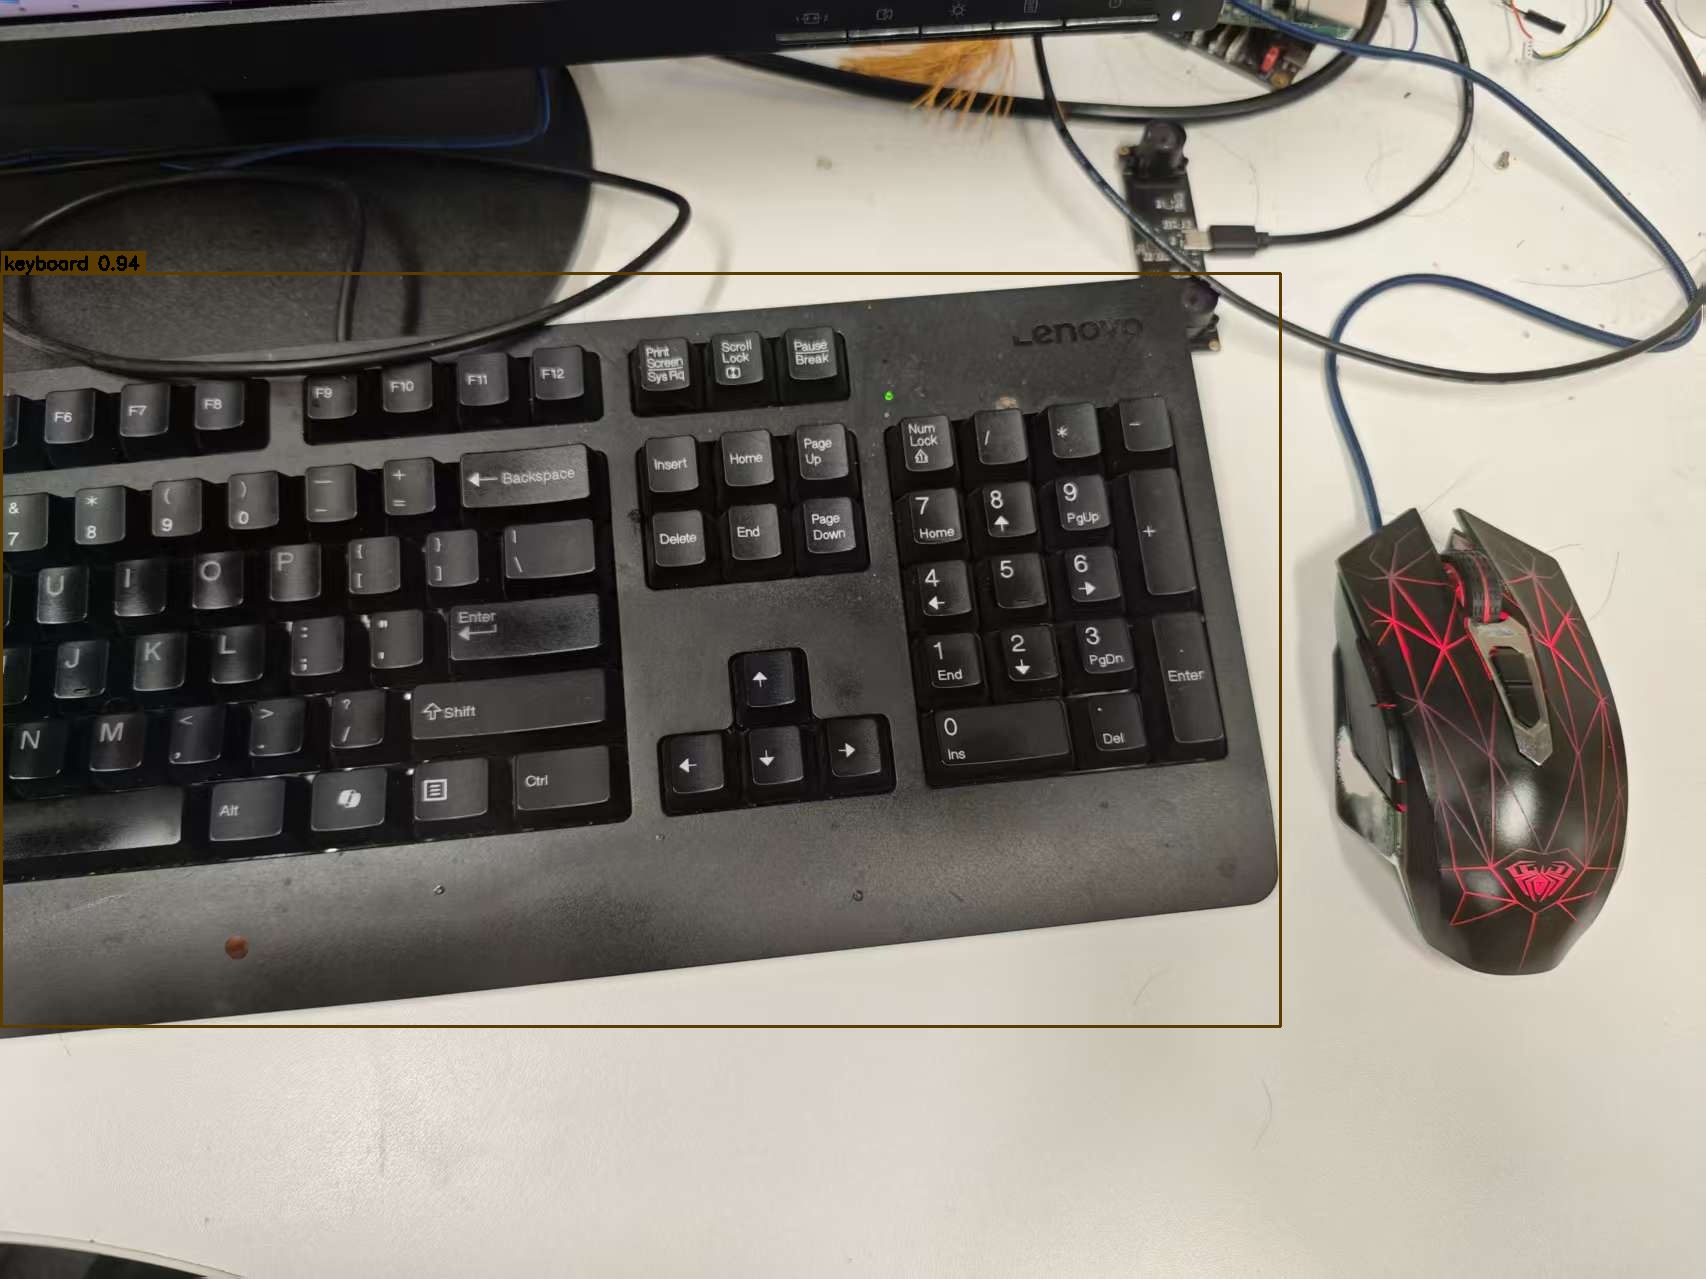
输出效果说明
彩色半透明掩膜:每个实例用不同颜色填充,贴合目标轮廓。
矩形框 + 标签:标注类别与置信度(如上例
keyboard 0.94)。推理耗时:约 0.5s/张(CPU 模拟推理)。
常见问题
现象 |
原因与解决办法 |
|---|---|
导入 onnxruntime 崩溃(信号 132) |
系统自带包用了高版本 ARM 指令,请使用 /opt/yolo/ort 兼容版(脚本已自动处理)。 |
Opset 22 加载失败 |
onnxruntime 需 ≥ 1.21(脚本默认 1.22.1)。 |
分割掩膜与框错位 |
已按 ROI 实际尺寸重采样掩膜,正常不会出现;若出现可检查图片尺寸是否过小。 |
分割不到目标 |
降低 --conf(如 0.15),或换目标更清晰、占画面更大的图片。 |